
Owners manual


Instruction manual
4
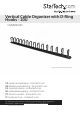
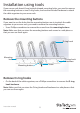
Tool-less installation
If you don’t need to move the mounting buttons or D-ring hooks, you don’t require any
tools to attach the cable organizer to a server rack or cabinet.
Note: You can attach the cable organizer to the outside or the inside of the server rack
or cabinet.
• Attach the cable organizer to the server rack or cabinet so that the mounting
buttons t into the keyhole-shaped mounting holes on the server rack or cabinet.
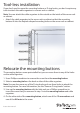
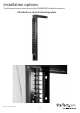
Relocate the mounting buttons
The mounting buttons come preinstalled but you can move them to any of the holes
on the cable organizer.
1. Use a Phillips screwdriver to remove the screw from the mounting button.
2. Select a mounting hole on the back or sides of the cable organizer.
Note: You can also move any of the D-ring hooks and use those holes to attach the
mounting button. For more information, see the “Remove D-ring hooks” section.
3. Line up the mounting button with the hole and use a Phillips screwdriver to
insert the screw that you removed in step 1 into the mounting button and cable
organizer.
4. On the other side of the mounting button, attach one of the 12 mm washers and
one of the M4 nuts to the screw.