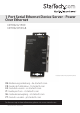
Port Serial Ethernet Device Server - Power Over Ethernet NETRS2321POE NETRS23POEGB *actual product may vary from photos DE: Bedienungsanleitung - de.startech.com FR: Guide de l'utilisateur - fr.startech.com ES: Guía del usuario - es.startech.com IT: Guida per l'uso - it.startech.com NL: Gebruiksaanwijzing - nl.startech.com PT: Guia do usuário - pt.startech.com For the most up-to-date information, please visit: www.startech.
FCC Compliance Statement This equipment has been tested and found to comply with the limits for a Class B digital device, pursuant to part 15 of the FCC Rules. These limits are designed to provide reasonable protection against harmful interference in a residential installation. This equipment generates, uses and can radiate radio frequency energy and, if not installed and used in accordance with the instructions, may cause harmful interference to radio communications.
Table of Contents Introduction.............................................................................................1 Package contents....................................................................................................................................... 1 Front Panel.................................................................................................................................................... 1 Rear Panel.............................................................
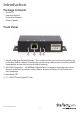
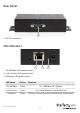
Introduction Package contents • • • • Driver CD Industrial Switch Instruction Manual Power Adapter Front Panel 1 2 3 4 1. Switch to Restore Default Settings - This switch can be used to reset the product to its factory default settings. Pressing the switch using either a pen or similar tool will immediately restore the unit to its default settings. 2. RJ45 LAN Connector - 10/100Mbps Ethernet port.
Rear Panel 1 1. RS-232 Connector LED Indicators 1 2 3 1. 10/100 Mbps LED (amber colour) 2. Link / Activity LED (green colour) 3.
Hardware Installation 1. Use static electricity discharge precautions. Remove possible static discharge potential from any objects that the adapter may come in contact with prior to installation. This can be accomplished by touching a bare metal chassis rail after you have turned off the power. 2. If you will be externally powering the device, connect the DC power adapter.
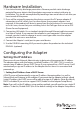
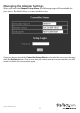
2. Setting the IP Address using a Web Browser Please ensure that your PC’s IP address is set to the same subnet as the adapter. If not, you will need to change your PC’s IP address from Local Area Connection Properties menu, shown below: Run your browser and access the product by entering the default (192.168.1.254) or current IP address into your browser’s address window. Enter the password (default has no password), then go to Change your IP Address, and make the necessary changes. 3.
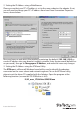
Managing the Adapter Settings When you enter the Adapter Setup Menu, the following page will be available for your access. By default there is no password for entry. Once you have entered the Controller Setup Menu and made the necessary changes, click the Update button. Also ensure that you make note of your password as you will need it to enter the setup menu again.
Controller Setup Menu Items Menu Item Description IP Address 4 numbers separated by dots. If enabled, these can be assigned by the DHCP server. Subnet Mask 4 numbers separated by dots. If enabled, these can be assigned by the DHCP server. Gateway Address 4 numbers separated by dots. If enabled, these can be assigned by the DHCP server. DHCP Client If disabled, the IP address, Subnet mask and Gateway address must be assigned manually.
Menu Item Description Socket Port of Serial I/O Port Number: Any number between 1 and 65536,except 80 and 8080 (these have been designated as the web pages). Socket Type: TCP Server - Uses TCP protocol, passively waits for Client. TCP Client - Uses TCP protocol, actively connects to Server. UDP Client - Uses UDP protocol, exchanges packets with Server without connection. Socket Port of Digital I/O Spared function for the future expansion. Currently has no function.
Menu Item Description Report device ID when connected If this function is enabled, the device will report the device ID after the socket is connected. The format is: Serial I/O socket nnnnnA[LF][CR] Digital I/O socket nnnnnB[LF][CR] There are eight bytes: nnnnn is the 5-digit device ID, [LF] is decimal 10, and [CR] is decimal 13 Setup password The login password can be empty or 1 to 15 characters long. If the password is empty then no password is required for login.
2. Configure your hardware mode to support VSP. • Run the ETM.exe application to find the device hardware • Enter the setup menu by double clicking the listed hardware. • Click Login (by default settings, there is no password). • Change the settings to COM Port, save the changes, and exit the setup menu. 3. Run the VSP Setup Program. • Double click the VserPortConsole.exe application in the VSP folder on the supplied CD.
• Select the COM ports to be redirected by checking the boxes next to them: • Set the COM Port settings: The following figure shows only one COM port setting being changed. You may have 4 COM ports (or 1, 2 ports depending on the model), you will need to set it 4 times for, once for each COM port.
Specifications Specification NETRS2321POE Connector RJ45 Speed 10/100 Mbps RS-232 Number of Ports 1 x RS-232 Signals TXD, RXD, RTS, CTS, DTR, DSR, DCD, GND Connector DB9 Male (RS-232) Parity None, Odd, Even Data Bits 6, 7, 8 Stop Bits 1, 2 Speed 300 to 115.2Kbps Power Requirements 12V DC (via DC Jack), or Power Input 48V DC (via Ethernet Cable, PoE model only) Power Consumption 110mA @ 12V DC Mechanical Specifications Material Metal Gross Weight 250.5g (0.
Technical Support StarTech.com’s lifetime technical support is an integral part of our commitment to provide industry-leading solutions. If you ever need help with your product, visit www.startech.com/support and access our comprehensive selection of online tools, documentation, and downloads. For the latest drivers/software, please visit www.startech.com/downloads Warranty Information This product is backed by a two year warranty. In addition, StarTech.
Hard-to-find made easy. At StarTech.com, that isn’t a slogan. It’s a promise. StarTech.com is your one-stop source for every connectivity part you need. From the latest technology to legacy products — and all the parts that bridge the old and new — we can help you find the parts that connect your solutions. We make it easy to locate the parts, and we quickly deliver them wherever they need to go. Just talk to one of our tech advisors or visit our website.