NETRS232 Series Quick Installation & Advanced Features Guide Rev.
1 Getting Started Congratulations on your purchase of a StarTech NETRS232. NETRS232s connect serial devices to Ethernet networks. Any serial device—POS equipment, factory machinery, monitoring hardware, or security devices, for example—can send its information to the NETRS232.The NETRS232 places the serial data in a TCP/IP wrapper and sends it out its Ethernet port. Data moving the other direction, from the Ethernet side of the NETRS232 to the serial device, undergoes the same process in reverse.
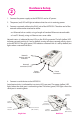
Hardware Setup 2 1. Connect the power supply to the NETRS232 and to AC power. 2. The power (red) LED will light to indicate that the unit is receiving power. 3. Connect a network cable to the RJ-45 jack of the NETRS232.The other end of the network cable can be attached to either: • an Ethernet hub or switch, using a length of standard Ethernet network cable • a host PC directly, using an Ethernet cross-over cable. Network status is indicated by two LEDs on the RJ-45 connector.
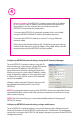
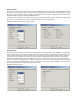
Software Installation and Configuration 3 Software installation and configuration consists of the following: A. Running the NETRS232 setup software B. Configuring network settings C. Activating and deactivating NETRS232 ports D. Optional advanced port configuration A. Running the NETRS232 setup software The installation diskette has files to install NETRS232 drivers on your PC and to detect NETRS232 devices on your network.To run the installation software, insert the installation diskette and run "Setup.
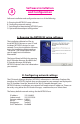
4 Before Proceeding: The NETRS232 is factory preset with an IP address of 192.168.0.35. If this IP address cannot be used on the network (it may already in use, for instance), do not initially connect the NETRS232 to the network. Instead, either: 1) connect the NETRS232 to a network segment that is not already using the NETRS232 default IP address for another device or, 2) connect the NETRS232 directly to a host PC using an Ethernet crossover cable.
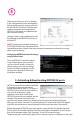
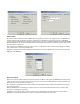
5 Choose the setting you wish to change. In the configuration screen that appears, and enter the network settings you wish for that NETRS232 device. Once the new values are entered and accepted, the NETRS232 will reboot to implement the new network settings. Changes made using a web browser will be updated to the NETRS232 but not to the local PC.
6 panel of the IP-Extender Manager, and select "Deactivate".To deactivate all ports on a particular NETRS232 device, right click on that device in the left panel of the Manager and select “Remove All”.
NETRS232 Advanced Features This document describes the advanced configuration features of the NETRS232. It covers: 1. 2. 3. 4. NETRS232 port modes Virtual port (driver) settings Virtual port (driver) bindings Virtual port COM number assignment 1. NETRS232 port modes The NETRS232 converts serial port data to and from TCP/IP packets over Ethernet. Each NETRS232 port exchanges TCP/IP packets on its own unique TCP port (called the "Local Port" in the Properties dialog box).
Raw Server Mode This mode is used to establish a raw TCP connection to a NETRS232 port. The physical port on the NETRS232 is made available as a network resource with a specified IP address and port number. In this mode, authorized users can set bits per second, data bits, parity, stop bits, and flow control port-by-port, to match the requirements of the Data Terminal Equipment (DTE) connected to the physical NETRS232 port. Control lines can be triggered by the TCP connection being established.
RFC2217 Mode Users who want to communicate with a NETRS232 across gateways or routers can configure a port on a NETRS232 to operate in RFC 2217 mode, allowing serial port configuration commands and serial data to be sent to a NETRS232 using the RFC 2217 framework for serial port control over Telnet. For those not familiar with RFC 2217 (the Telnet COM Port Control Option), the text of the actual RFC (Request For Comments) is available at www.faqs.org/rfcs/rfc2217.html or at any number of other sites.
Ethernet Modem Mode This mode allows Data Terminal Equipment (DTE) to control the NETRS232 using the conventional modem "AT" command set. In this mode, a DTE user is able to "dial" an IP address and TCP port. Incoming TCP connections are handled under AT command set rules. The standard serial port settings for bits per second, data bits, parity, stop bits, and flow control are available for configuration, and should be set to match the DTE.
RAS Server Mode Windows-based devices that have Remote Access Services (RAS) client capability but are not equipped with a direct network interface can access the network through a serial port using the Point-to-Point Protocol (PPP). The serial port of the RAS client device is attached to the serial port of the NETRS232, configured in RAS Server mode. The RAS negotiations are conducted between the RAS client and the NETRS232 RAS server.
Applications: Windows CE embedded systems, Palm type units, or other portable data acquisition devices that may need access to a TCP/IP-Ethernet environment, and have PPP capability, but do not have a Ethernet port, can be connected to the serial port of a NETRS232. Disabled Mode This mode simply disables a port; it has no configuration settings. 2.
(for example, when a DHCP server assigns addresses). This address reassignment will cause virtual ports to fail or make unintended connections to unintended NETRS232s. Therefore, NETRS232s are designed with the ability to "find" a NETRS232 port based on a "binding". A port binding is a network identification of the target NETRS232 that must match before a driver port will initiate a connection. Bindings may be made to the MAC address, Name, or IP address of the associated device.
4. Virtual port COM number assignment By default, an NETRS232 virtual serial port is assigned to the next available COM number when it is activated. This COM number assignment can be reassigned to any unused COM number from 1 to 256.
Technical Support The following technical resources are available for this StarTech.com product: On-line help: We are constantly adding new information to the Tech Support section of our web site. To access this page, click the Tech Support link on our homepage, www.startech.com. In the tech support section there are a number of options that can provide assistance with this product.