USB 3.0 to 2.5in SATA Hard Drive Enclosure with UASP S2510SM12U33 *actual product may vary from photos DE: Bedienungsanleitung - de.startech.com FR: Guide de l'utilisateur - fr.startech.com ES: Guía del usuario - es.startech.com IT: Guida per l'uso - it.startech.com NL: Gebruiksaanwijzing - nl.startech.com PT: Guia do usuário - pt.startech.com For the most up-to-date information, please visit: www.startech.
FCC Compliance Statement This equipment has been tested and found to comply with the limits for a Class B digital device, pursuant to part 15 of the FCC Rules. These limits are designed to provide reasonable protection against harmful interference in a residential installation. This equipment generates, uses and can radiate radio frequency energy and, if not installed and used in accordance with the instructions, may cause harmful interference to radio communications.
Table of Contents Product Diagram.....................................................................................1 Introduction.............................................................................................2 Packaging Contents.................................................................................................................................. 2 System Requirements...................................................................................................................
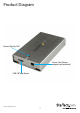
Product Diagram Power/Activity LED Power Jack (Power adapter not included) USB 3.
Introduction Packaging Contents • 1 x USB 3.0 SATA HDD Enclosure • 1 x USB 3.0 Cable • 1 x Screw kit • 1 x foot pad set • 1 x Instruction Manual System Requirements • Computer system with available USB 3.0 (5 Gbit/s) port or USB 2.0 port (480Mbps) • 2.5” SATA hard drive or solid state drive • Microsoft® Windows® 2000/XP/Server 2003/Vista/Server 2008 R2/7/8 (32/64-bit), or Apple® Mac® OS 9.
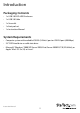
Installation Hardware Installation WARNING! Hard drives and storage enclosures require careful handling, especially when being transported. If you are not careful with your hard disk, lost data may result. Always handle your hard drive and storage device with caution.
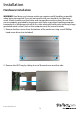
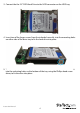
3. Connect the the 2.5” SATA Hard Drive to the SATA connector on the HDD tray. 4. Insert two of the larger screws from the included screw kit, into the mounting holes on either side of the drive tray to fix the hard drive into place. 5. Turn the tray over and insert two of the smaller screws from the included screw kit into the mounting holes on the bottom of the tray using the Phillips head screw driver, to fix the drive into place.
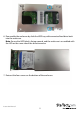
6. Reassemble the enclosure by slide the HDD tray with connected hard drive back into the enclosure. Note: Ensure the HDD label is facing upward, and the enclosure is assembled with the LED on the same side of the drive connector. 7. Reinsert the four screws on the bottom of the enclosure.
8. Complete installation by connecting the included USB cable from the USB 3.0 type B port on the enclosure to an available USB port on the computer system. Note: The hard drive enclosure has a built-in auxiliary Power Jack that is not required for standard operation. An additional 5V power source be added in the event your USB port does not provide sufficient power.
LED Indicator The hard drive enclosure offers an LED indicator, to enable you to monitor drive activity. When the enclosure is powered, the LED will illuminate. While the hard drive is being accessed, the LED will blink. Do not remove the enclosure from the host computer while the LED is flashing, as it could damage the drive or the enclosure, resulting in data loss. Disconnecting the Hard Drive Windows 1. Select the “Safely remove Hardware and Eject Media” icon, located in the task bar. 2.
Initializing the Hard Drive 1. If the SATA Hard Drive is blank it may need to be initialized and formatted before use. From the main Windows desktop, right-click on “My Computer” (“Computer” in Vista/ 7 / 8), then select Manage. In the new Computer Management window, select Disk Management from the left window panel. 2. A dialog window should automatically appear, asking you to initialize the drive. Depending on the version of Windows, it will give you the option of either creating an “MBR” or “GPT” disk.
Specifications Host Interface USB 3.0 1 x 15 pin SATA Power female External Connectors 1 x 7 pin SATA Data male 1 x USB 3.0 Cable Maximum Data Transfer Rate USB 3.
Technical Support StarTech.com’s lifetime technical support is an integral part of our commitment to provide industry-leading solutions. If you ever need help with your product, visit www.startech.com/support and access our comprehensive selection of online tools, documentation, and downloads. For the latest drivers/software, please visit www.startech.com/downloads Warranty Information This product is backed by a two year warranty. In addition, StarTech.
Hard-to-find made easy. At StarTech.com, that isn’t a slogan. It’s a promise. StarTech.com is your one-stop source for every connectivity part you need. From the latest technology to legacy products — and all the parts that bridge the old and new — we can help you find the parts that connect your solutions. We make it easy to locate the parts, and we quickly deliver them wherever they need to go. Just talk to one of our tech advisors or visit our website.