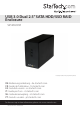
USB 3.0 Dual 2.5” SATA HDD/SSD RAID Enclosure S252BU33R *actual product may vary from photos DE: Bedienungsanleitung - de.startech.com FR: Guide de l'utilisateur - fr.startech.com ES: Guía del usuario - es.startech.com IT: Guida per l'uso - it.startech.com NL: Gebruiksaanwijzing - nl.startech.com PT: Guia do usuário - pt.startech.com For the most up-to-date information, please visit: www.startech.
FCC Compliance Statement This equipment has been tested and found to comply with the limits for a Class B digital device, pursuant to part 15 of the FCC Rules. These limits are designed to provide reasonable protection against harmful interference in a residential installation. This equipment generates, uses and can radiate radio frequency energy and, if not installed and used in accordance with the instructions, may cause harmful interference to radio communications.
Table of Contents Product Diagram.....................................................................................1 Front View..................................................................................................................................................... 1 Rear View....................................................................................................................................................... 1 Introduction......................................................
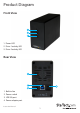
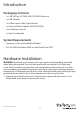
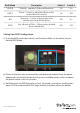
Product Diagram Front View 1. Power LED 2. Drive 1 activity LED 3. Drive 2 activity LED Rear View 1. Built-in fan 2. Power switch 3. USB 3.0 port 4.
Introduction Packaging Contents • 1 x USB 3.0 Dual 2.5” SATA HDD/SSD RAID Enclosure • 1 x USB 3.0 cable • 1 x USB to Power Cable (Type H Barrel) • 1 x Universal Power Adapter (NA/EU/UK/AUS) • 1 x Installation screw kit • 1 x Quick install guide System Requirements • Computer system with available USB port • 2x 2.5in SATA Hard drive (HDD) or Solid State Drive (SSD) Hardware Installation WARNING! Hard drives and storage enclosures require careful handling, especially when being transported.
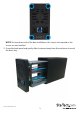
NOTE: For brand new out of the box installations, this step is not required as the screws are not installed. 2. Grasp the back panel and gently slide it outward away from the enclosure to reveal the drive tray.
3. Place the drive tray on its side, so the green set RAID button is facing upward. Green set RAID button 4. Slide a 2.5in HDD/SSD into each of the drive trays, so that the SATA plug on the drives line up with the SATA reciprocals on each of the drive bays.
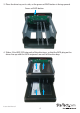
5. Fix the drives into place by using a Philip’s head screw driver to drive eight of the drive screws (silver) into each of the drive mounting holes on the drive tray (four on either side). 6. Set your desired RAID configuration. The RAID mode dip switches (1 & 2), located next to the green set RAID button, enable you to set your desired RAID configuration between RAID 0, RAID 1, JBOD and BIG. Using the dip switches and the table below, set the dip switches to your desired RAID mode.
RAID Mode Description Switch 1 Switch 2 RAID 0 Striping - Improves system performance On On RAID1 Mirror – Creates a redundant drive on the second drive for security On Off BIG Spanning – Creates a large single drive volume consisting of both drives. Off On JBOD Just a Bunch of Disks – Allows access to both drives individually Off Off Setting Your RAID Configuration a) Using the RAID mode dip switches, and the above table, set the device to your desired RAID Mode.
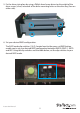
d) Your RAID configuration has now been set. Note: To complete installation, power off the drive tray by placing the power switch in the “off” position, and disconnecting the power adapter. 7.Slide the drive tray back into the enclosure, and replace the four screws on the back panel using a Philip’s head screw driver. 8. Using the included power adapter, connect the power adapter port on the enclosure to an available power outlet. 9. Connect the USB 3.
Technical Support StarTech.com’s lifetime technical support is an integral part of our commitment to provide industry-leading solutions. If you ever need help with your product, visit www.startech.com/support and access our comprehensive selection of online tools, documentation, and downloads. For the latest drivers/software, please visit www.startech.com/downloads Warranty Information This product is backed by a two year warranty. In addition, StarTech.
Hard-to-find made easy. At StarTech.com, that isn’t a slogan. It’s a promise. StarTech.com is your one-stop source for every connectivity part you need. From the latest technology to legacy products — and all the parts that bridge the old and new — we can help you find the parts that connect your solutions. We make it easy to locate the parts, and we quickly deliver them wherever they need to go. Just talk to one of our tech advisors or visit our website.