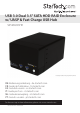
USB 3.0 Dual 3.5” SATA HDD RAID Enclosure w/ UASP & Fast Charge USB Hub S352BU33HR *actual product may vary from photos DE: Bedienungsanleitung - de.startech.com FR: Guide de l'utilisateur - fr.startech.com ES: Guía del usuario - es.startech.com IT: Guida per l'uso - it.startech.com NL: Gebruiksaanwijzing - nl.startech.com PT: Guia do usuário - pt.startech.com For the most up-to-date information, please visit: www.startech.
FCC Compliance Statement This equipment has been tested and found to comply with the limits for a Class B digital device, pursuant to part 15 of the FCC Rules. These limits are designed to provide reasonable protection against harmful interference in a residential installation. This equipment generates, uses and can radiate radio frequency energy and, if not installed and used in accordance with the instructions, may cause harmful interference to radio communications.
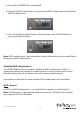
Table of Contents Product Diagram.....................................................................................1 Front View..................................................................................................................................................... 1 Rear View....................................................................................................................................................... 1 Introduction......................................................
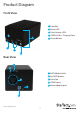
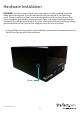
Product Diagram Front View 3 1 2 1 Front Bay 2 Power LED 3 Drive Activity LEDs 4 USB 3.0 Hub + Charging Ports 5 Power Button 1 RAID Mode Switch 2 Set RAID button 3 Drive Fan 4 USB 3.
Introduction Packaging Contents • USB 3.0 Hard Drive Enclosure (S352BU33HR) • USB 3.0 Cable • Universal Power Adapter (NA/UK/EU) • Instruction Manual System Requirements • 1x Computer system with available USB 3.0 (5 Gbit/s) port/USB 2.0 port (480Mbps) • Microsoft® Windows® 2000/XP/Server 2003/Vista/Server 2008 R2/7/8 (32/64 bit), Apple® Mac® OS 9.x/10 • Linux® • Google Chrome OS™ • 2x 3.
Hardware Installation WARNING! Hard drives and storage enclosures require careful handling, especially when being transported. If you are not careful with your hard disk, lost data may result. Always handle your hard drive and storage device with caution. Be sure that you are properly grounded by wearing an anti-static strap when handling computer components or discharge yourself of any static electricity build-up by touching a large grounded metal surface (such as the computer case) for several seconds. 1.
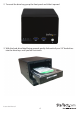
2. To reveal the drive bay, grasp the front panel and slide it upward. 3. With the hard drive label facing upward, gently slide each of your 3.5” hard drives into the drive bays until you feel resistance.
4. Slide the front panel back onto the S32BU33HR the same way it was removed. 5. Using a Philips head screw driver (not included), replace the side mounted screw on the left front facing side of the enclosure.
6. Using the included power adapter, connect the Power Adapter Port on the S352BU33HR to an available power outlet. 7. Connect the S352BU33HR to your computer system using the included USB 3.0 cable. 8. Set your desired RAID configuration and power on the device. WARNING! In order to prepare your drives for RAID operation, this enclosure will configure newly installed drives into your desired RAID configuration. Please be aware that any data currently on the drives may be lost during this process.
a) Ensure the S352BU33HR is powered off. b) Adjust the RAID Control Switch to your desired RAID configuration (See Available RAID Configurations). c) Press and hold the set RAID button while turning on the S352BU33HR on by pressing the Power Button. Note: RAID configuration is only required for initial configuraiton or if you would like to change your RAID configuration. Available RAID Configurations The S352BU33RER enclosure supports 4 different RAID configurations.
Combine - BIG In BIG, both drives appear together as a single large disk the size of both drives combined. This configuration enables you to create a larger volume than would be available using a single drive without the performance increase offered with RAID 0. R1 (RAID1) – Mirroring In RAID1 both drives appear as a single disk and data is written identically to both. This level protects your data from individual drive failure as a backup of all data is written instantly.
JBOD - Normal Enclosure Powered On Both Drives Installed and detected Blue LED Red LED HDD 1 On Off HDD 2 On Off Drives being accessed Drive 2 disconnected or dropped N/A N/A RAID LED Off Note: Instruction Manual N/A 9 Drive 2 reconnected New drive connected Sle
R1 (RAID1) – Mirroring Enclosure Powered On Drives Blue LED HDD 1 HDD 2 Red RAID LED LED ON OFF ON OFF OFF Drive 2 Disconnected or Dropped being Accessed Both Drives Installed and Detected Blue LED Red RAID LED LED ON BLINK ON BLINK OFF Blue LED Red RAID LED LED ON OFF OFF SOLID SOLID Drive 2 Reconnected Blue LED Red RAID LED LED ON BLINK ON BLINK BLINK * No power cycle is required but recommended.
Disconnecting the Hard Drive Windows 1. Select the “Safely remove Hardware and Eject Media” icon, located in the task bar. 2. Select the Mass Storage Device from the list that appears. 3. Wait for the message indicating that it is now safe to remove the device. Note: Removing the connected drive prior to receiving notification that it is safe to do so, could result in losing or corrupting data stored on the drive.
Initializing the Hard Drive 1. If the drive array is new it may need to be initialized and formatted before use. From the main Windows desktop, right-click on “My Computer” (“Computer” in Vista/ 7 / 8), then select Manage. In the new Computer Management window, select Disk Management from the left window panel. 2. A dialog window should automatically appear, asking you to initialize the drive. Depending on the version of Windows, it will give you the option of either creating an “MBR” or “GPT” disk.
3. Once initialized, locate the Disk that says it is “Unallocated” (check the listed hard drive capacity to confirm it’s the correct hard drive) and then right-click in the section that says “Unallocated” and select “New Partition”. 4. Several on screen prompts will follow walking you through the steps to create the partition. Follow these prompts to complete partition creation.
Technical Support StarTech.com’s lifetime technical support is an integral part of our commitment to provide industry-leading solutions. If you ever need help with your product, visit www.startech.com/support and access our comprehensive selection of online tools, documentation, and downloads. For the latest drivers/software, please visit www.startech.com/downloads Warranty Information This product is backed by a two year warranty. In addition, StarTech.
Hard-to-find made easy. At StarTech.com, that isn’t a slogan. It’s a promise. StarTech.com is your one-stop source for every connectivity part you need. From the latest technology to legacy products — and all the parts that bridge the old and new — we can help you find the parts that connect your solutions. We make it easy to locate the parts, and we quickly deliver them wherever they need to go. Just talk to one of our tech advisors or visit our website.