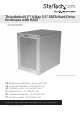
Thunderbolt 2™ 4-Bay 3.5” SATA Hard Drive Enclosure with RAID S354SMTB2R *actual product may vary from photos DE: Bedienungsanleitung - de.startech.com FR: Guide de l'utilisateur - fr.startech.com ES: Guía del usuario - es.startech.com IT: Guida per l'uso - it.startech.com NL: Gebruiksaanwijzing - nl.startech.com PT: Guia do usuário - pt.startech.com For the most up-to-date information, please visit: www.startech.
FCC Compliance Statement This equipment has been tested and found to comply with the limits for a Class B digital device, pursuant to part 15 of the FCC Rules. These limits are designed to provide reasonable protection against harmful interference in a residential installation. This equipment generates, uses and can radiate radio frequency energy and, if not installed and used in accordance with the instructions, may cause harmful interference to radio communications.
Table of Contents Introduction.............................................................................................1 Packaging Contents.................................................................................................................................. 1 Recommended System Requirements............................................................................................... 1 Product Diagram.....................................................................................
Introduction Packaging Contents • 1X – Thunderbolt 4-bay 3.5in Hard Drive RAID Enclosure • 1X – 2m Thunderbolt Cable • 4x – HDD bracket kits (2 brackets per kit) • 3X – Allen key • 1X – Universal Power Adapter (NA/EU/UK) • 1X – Instruction Manual Recommended System Requirements • 1X Computer system with: Available Thunderbolt port Apple® Mac® OSX Microsoft® Windows 8/8.1, Server 2008 R2 (32/64-bit) • 4X 3.5” SATA Hard Drives Note: 2.
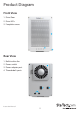
Product Diagram Front View 1. Drive Door 2. Drive LEDs 3. Faceplate screws 1 2 3 Rear View 1. Built-in drive fan 2. Power switch 1 3. Power adapter port 4.
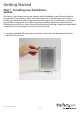
Getting Started Step 1. Installing your hard drives. WARNING: Hard drives and storage enclosures require careful handling, especially when being transported. If you are not careful with your hard disk, lost data may result. Always handle your hard drive and storage device with caution.
2. Grasp the drive door and gently pull it outward to reveal the drive bays. 3. On each of your four 3.5in hard drives, place HDD mounting brackets from each of your HDD mounting kits on either side of the drives, aligning the pegs with the hard drive mounting holes. Then with your hard drive labels facing upward, slide each of your four 3.5in hard drives into an available drive bay with the SATA connector facing inward, using the HDD bracket to align the slot.
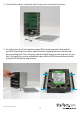
4. Place the drive door back over the drive bays so that the four screw holes are lined up. 5. Using the included Allen key, drive each of the four screws back into the enclousre through the front place plate.
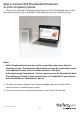
Step 2. Connect the Thunderbolt Enclosure to your computer system. 1. Connect the included Thunderbolt cable from one of the Thunderbolt ports on the back of the enclosure, to an available Thunderbolt port on your computer system. Notes: • Either Thunderbolt port may be used to connect the enclosure to the host computer system. The remaining Thunderbolt port may be used to daisy chain to an additional device such as another enclosure, or Display.
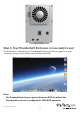
Step 3. Your Thunderbolt Enclosure is now ready to use! The hard drives installed in your Thunderbolt Enclosure will now appear in in your computer systems just as if they were installed internally. Notes: • The Thunderbolt Enclosure supports Hardware RAID. By default the Thunderbolt enclosure is configured for JBOD RAID operation.
Step 4 (Optional). Install the RAID management software (Marvell Storage Utility or MSU) on your computer to configure Your Thunderbolt Enclosure for Hardware RAID operation. Note: The Thunderbolt enclosure also supports software RAID configured within the Windows and Mac OSX operating systems. Supported Hardware RAID modes: JBOD In JBOD, no RAID configuration is set and all drives appear as individual disks. RAID1 In RAID1 two drives appear as an individual disk and data is written identically to both.
Software Installation Mac OSX 1. Download the RAID Management Tool (MSU) from: StarTech.com/Support 2. Open the “osx” folder from the main directory and launch the smu4.1.0.2021 installer file. Then double click the msu installer package. 3. The windows installation wizard will walk you through the remaining installation steps. To complete the installation, click the Next button on each window, and accept the License Agreement when displayed.
4. Once installation is complete, click the Finish button. The Marvell Storage Utility has now been installed. Windows 8/8.1, 7, Vista (32/64 bit) 1. Download the RAID Management Tool from: StarTech.com/Support 2. Open the “Win” folder from the main directory and launch the MSUSetupX.X.XXXX(.exe) setup file. You may receive a Windows Security Warning alerting you that the application has been launched. Click Run.
3. The windows installation wizard will walk you through the remaining installation steps. To complete the installation, click the Next button on each window, and accept the License Agreement when displayed. 4. Once installation is complete, click the Finish button. The Marvell Storage Utility has now been installed.
Software Operation The Marvell Storage Utility (MSU) is a browser-based management utility that can create and manage RAID and HyperDuo virtual disks using your Thunderbolt hard drive enclosure. Note: Active Scripting or JavaScript must be enabled in your default web browser. Create a RAID Array WARNING! In order to prepare your drives for RAID operation, this enclosure will configure newly installed drives into your desired RAID configuration.
b) Mac OSX users require their User name and password to login. Note: In Mac OSX there are two user names: a friendly username, and an actual user name. Please note that the actual user name is required to login. 3. Select Adapter from the Marvell Storage menu, then hover-over the operation tab, and select Create RAID. 4. The Create New VD window is now displayed, using the Select RAID Level drop down menu choose your desired RAID mode.
5. Your physically installed hard drives will be represented on the Create New VD Window. Select each drive you would like included in your RAID array. Then click the Next Button. Note: The Next button will not be selectable, until the correct number of physical hard drives have been selected to build your desired array. 6. A default name will now be assigned to your RAID array. If you would like to rename the array, click the Name field and type your desired name.
Note: a number of advanced customizable options can also be changed such as Name, Initialize setting, Cache Modes, RAID Set Size, Stripe Size, and Gigabyte Rounding (It is recommended that they are left as their defaults). 8. Your RAID array has now been created. The Property tab will now be displayed for your newly created RAID array. Create a HyperDuo Array WARNING! In order to prepare your drives for HyperDuo operation, this enclosure will configure newly installed drives into HyperDuo configuration.
3. The Create HyperDuo Screen is now displayed. Using the Mode drop down menu, select Safe or Capacity depending on your desired mode (a description for both modes is listed below) then click the submit button. Mode Description Safe Creates an array for optimal fault tolerance. Capacity Creates an array for optimal performance.
Managing Your Array View Properties of your RAID/HyperDuo Array 1. Launch the MSU software using the icon on your desktop, and login. 2. Select your desired array from list of Virtual Disks in the Marvell Storage Menu. The Property tab is now displayed, listing the Properties for your array. Rename Your Array 1. To rename your Array select the Name field on the Property tab and type your desired Name in the field. Then click the Modify button. 2. Your Array has now been renamed.
Delete Your Array WARNING! Deleting your RAID array permanently erases any data on your virtual disk. However, you can choose to keep partition information on the virtual disk. 1. Hover-over the Operation tab at the top of the Property page and select Delete. 2. A warning will be displayed alerting you that all data on the virtual disk will be erased. Select OK to acknowledge the warning. 3. An additional pop-up message warning you that drive data will be lost is displayed. Click Ok continue. 4.
3. Navigate through the folders and place a check next to the folders you would like to add. Note: You can navigate into each folder by clicking the folder name. Or return to the parent directory by clicking the green button with white arrow. 4. Click Next to add selected folders. 5. Review the folders and click the red X beside a folder or file to remove it. 6. Click the submit button to save changes. Change Method of Optimization 1. Launch the MSU software using the icon on your desktop, and login. 2.
4. Click Submit to save your changes. 5. An alert window will be displayed, click OK to begin the optimization process. View Properties of your Physical Hard Drives 1. Launch the MSU software using the icon on your desktop, and login. 2. Select your desired physical disk from list of Physical Disks in the Marvell Storage Menu. The Property tab is now displayed, listing the Properties for your disk.
Note: Your physical disk properties cannot be edited. Erase Foreign RAID Configuration WARNING! When erasing previously configured RAID Data, this enclosure will erase all drive data. Please be aware that any data currently on the drives will be lost during this process. It is recommended that you back up all data prior to erasing previously configured RAID data. RAID controllers store data on any drive within a RAID array.
Technical Support StarTech.com’s lifetime technical support is an integral part of our commitment to provide industry-leading solutions. If you ever need help with your product, visit www.startech.com/support and access our comprehensive selection of online tools, documentation, and downloads. For the latest drivers/software, please visit www.startech.com/downloads Warranty Information This product is backed by a two year warranty. In addition, StarTech.
Hard-to-find made easy. At StarTech.com, that isn’t a slogan. It’s a promise. StarTech.com is your one-stop source for every connectivity part you need. From the latest technology to legacy products — and all the parts that bridge the old and new — we can help you find the parts that connect your solutions. We make it easy to locate the parts, and we quickly deliver them wherever they need to go. Just talk to one of our tech advisors or visit our website.