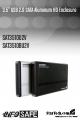
3.5” USB 2.
FCC Compliance Statement This equipment has been tested and found to comply with the limits for a Class B digital device, pursuant to part 15 of the FCC Rules. These limits are designed to provide reasonable protection against harmful interference in a residential installation. This equipment generates, uses and can radiate radio frequency energy and, if not installed and used in accordance with the instructions, may cause harmful interference to radio communications.
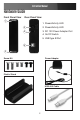
Instruction Manual Table of Contents Introduction..................................................................................... 1 Features.......................................................................................1 System requirements...................................................................1 Package contents.........................................................................1 Hardware Guide..............................................................................
Instruction Manual Introduction Thank you for purchasing a StarTech.com SAT3510U2V / SAT3510BU2V InfoSafe 3.5” USB 2.0 SATA Aluminum Hard Drive Enclosure. This costeffective storage solution suits a wide variety of applications including file and application sharing between desktop and notebook computers, data archiving, or simply backing up existing hard drives to preserve data security.
Instruction Manual Hardware Guide Front Panel View Rear Panel View 1 1. Power/Activity LED 3 2. Power/Activity LED 4 3. DC 12V Power Adapter Port 4. On/Off Switch 5.
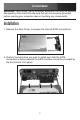
Instruction Manual WARNING: Hard drives, like all computer equipment can also be severely damaged by static electricity. Be sure that you are properly grounded before opening your computer case or touching any components. Installation 1. Remove the Rear Panel, to expose the internal SATA connections: 2.
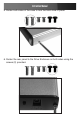
Instruction Manual 3. With the hard drive connected to the front panel, turn the drive over to expose it’s base. Fasten the hard drive to the front panel rails on both sides, using the screws provided (2): 4. Fasten the front panel (with drive attached) to the body of the Enclosure; be cautious that the drive and front panel are properly aligned with the body of the Enclosure, to prevent damage to the LEDs.
Instruction Manual 5. Fasten both sides of the case to lock the hard drive in place: 6. Fasten the rear panel to the Drive Enclosure on both sides using the screws (2) provided.
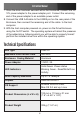
Instruction Manual 7. Once the drive has been secured within the Enclosure, connect the DC 12V power adapter to the power adapter port. Connect the remaining end of the power adapter to an available power outlet. 8. Connect the USB A-B cable to the USB B port on the rear panel of the Enclosure, then connect the remaining end of the cable to the host computer. 9. With the host computer powered on, power on the Drive Enclosure using the On/Off switch.
Instruction Manual Technical Support StarTech.com’s lifetime technical support is an integral part of our commitment to provide industry-leading solutions. If you ever need help with your product, visit www.startech.com/support and access our comprehensive selection of online tools, documentation, and downloads. Warranty Information This product is backed by a one year warranty. In addition, StarTech.
StarTech.com has been making “hard-to-find easy” since 1985, providing high quality solutions to a diverse IT and A/V customer base that spans many channels, including government, education and industrial facilities to name just a few. We offer an unmatched selection of computer parts, cables, A/V products, KVM and Server Management solutions, serving a worldwide market through our locations in the United States, Canada, the United Kingdom and Taiwan. Visit www.startech.