InfoSafe eSATA/USB 2.0 Dual 3.
FCC Compliance Statement This equipment has been tested and found to comply with the limits for a Class B digital device, pursuant to part 15 of the FCC Rules. These limits are designed to provide reasonable protection against harmful interference in a residential installation. This equipment generates, uses and can radiate radio frequency energy and, if not installed and used in accordance with the instructions, may cause harmful interference to radio communications.
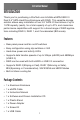
Instruction Manual Table of Contents Introduction ..................................................................... 1 Features.......................................................................................1 Package Contents........................................................................1 Hardware Guide................................................................ 2 Front View.....................................................................................2 Rear View..............
Instruction Manual Introduction Thank you for purchasing a StarTech.com InfoSafe eSATA/USB 2.0 Dual 3.5” SATA Hard Drive Enclosure with RAID. This versatile storage solution allows easy installation of two 3.5” SATA I/II hard drives of up to 1.5TB capacity (each), for a total capacity of up to 3Tb, and maximizes performance capabilities with support for a broad range of RAID applications including RAID 0, RAID 1, and Concatenated (BIG mode).
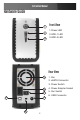
Instruction Manual Hardware Guide 1 2 3 Front View 1.Power LED 2.HDD-1 LED 3.HDD-2 LED Rear View 1 1. Fan 2. eSATA Connector 3. Power Switch 2 3 6 4 5 2 4. Power Adapter Socket 5. Fan Switch 6.
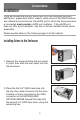
Instruction Manual Installation If you are connecting the SAT3520U2ER to a host computer using an eSATA port, please note that in order to utilize some of the RAID functionality offered by the enclosure, the eSATA port to which the drive enclosure is connected must provide a SATA port multiplier. If the eSATA port does not offer a port multiplier, only one of the two installed drives will be accessible. Please see the table on the following page for further details. Installing Drives in the Enclosure 1.
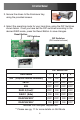
Instruction Manual 3. Secure the drives to the Enclosure tray, using the provided screws. 4. Select the operating mode for your hard drive using the DIP Switches shown below. Once you have set the DIP switches according to the desired RAID mode, press the Reset Button to save changes. Reset Button DIP Switches DIP Switches (GUI mode is shown) DIP Switch No.
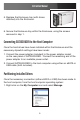
Instruction Manual 5. Replace the Enclosure tray (with drives attached) into the Enclosure. 6. Secure the Enclosure tray within the Enclosure, using the screws removed in step 1. Connecting SAT3520U2ER to the Host Computer Once the hard drives have been installed within the Enclosure and the necessary dipswitch settings have been made: 1. Connect the power adapter (included) to the power adapter socket on the rear panel of SAT3520U2ER.
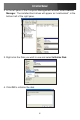
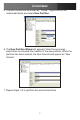
Instruction Manual 2. In the left pane of the Computer Management window, select Device Manager. The installed hard drives will appear as “unallocated”, in the bottom half of the right pane. 3. Right-click the Disk you wish to use and select Initialize Disk. 4. Click OK to initialize the disk.
Instruction Manual 5. The disk should now be shown as “Online.” Right-click on the unallocated block and select New Partition. 6. The New Partition Wizard will appear. Follow the on-screen instructions to complete the creation of the new partition. When the partition has been created, the hard drive should appear as “New Volume.” 7. Repeat steps 1-6 to partition the second hard drive.
Instruction Manual Software Operation Guide Software Installation Guide 1. Insert the included Driver CD into the CD/DVD-ROM drive on the computer to which the Enclosure will be connected (host computer). 2. Click on the Install GUI icon. 3. Follow the instructions provided by the SteelVine Setup Wizard to complete the GUI installation.
Instruction Manual Using the SteelVine Manager To start the program, click Start > Program Files > Silicon Image 57xx SteelVine > SteelVine Manager. Once started, the SteelVine Manager Application can be found in the Notification Tray, (typically located at the bottom right hand corner of the screen near the clock). Double-click on the notification tray to open the SteelVine Manager GUI status window.
Instruction Manual 3. Select the storage policy you wish to use, then click Apply to finalize the switching process. For further instructions pertaining to the operation of the SteelVine Manager, refer to the SteelVine User Guide included on your device’s software CD.
Instruction Manual RAID Mode Overview 1. GUI Mode This mode offers configuration through the GUI (Graphic Utility Inter- face), thus requiring that you install the included software. Using this mode, you can allow different RAID combinations through the software interface. This mode is recommended for professional and advanced users. GUI Mode retains the disk configuration of the last mode for which the enclosure was set (i.e.
Instruction Manual 4. RAID 0 (FAST) Mode A storage policy configuration in which I/O processing is balanced evenly to all disks in a method known as striping, equivalent to RAID 0. This mode offers the best performance in terms of speed, but no data redundancy. 5. RAID 1 (SAFE) Mode A storage policy configuration in which all data written to the hard drive is duplicated (mirrored) onto the second physical disk to protect against data loss due to disk failure.
Instruction Manual 6. SAFE33 Mode The RAID Mode is SAFE33, wherein 30% of each HDD is used to build a SAFE(mirror) RAID and also uses the rest of the capacity to build a second BIG(Span) HDD. In this mode, two physical drives will be recognized, one is SAFE(mirror) and the other is BIG(Span). 7. SAFE55 Mode This configuration takes 55% of both drives to build a SAFE(mirror) RAID; the remaining drive capacity is used to build a BIG(span) RAID.
Instruction Manual Specifications Chipset Silcon Image SIL5744 Supported Drive Size Supports up to 3 TB ( 1.5 TB for each bay) Power Adapter (12V 4.2A) 50W Maximum Data Transfer Rate eSATA - 3 Gbps USB 2.0 - 480 Mbps RAID Modes Supported JBOD, RAID 0,1, 0+1 and BIG+RAID 1 Fans 1 x 50mm Drive Type Compatibility SATA /300 (SATA II) and SATA /150 (SATA I) Hard Drives (Supports SATA specifications 1.0 & 2.0 OS Support Windows ME/2000/XP/2003/Vista, MAC OS 9.0 +, and Linux 2.4..1.
Instruction Manual Technical Support StarTech.com’s lifetime technical support is an integral part of our commitment to provide industry-leading solutions. If you ever need help with your product, visit www.startech.com/support and access our comprehensive selection of online tools, documentation, and downloads. Warranty Information This product is backed by a one year warranty. In addition, StarTech.
StarTech.com has been making “hard-to-find easy” since 1985, providing high quality solutions to a diverse IT and A/V customer base that spans many channels, including government, education and industrial facilities to name just a few. We offer an unmatched selection of computer parts, cables, A/V products, KVM and Server Management solutions, serving a worldwide market through our locations in the United States, Canada, the United Kingdom and Taiwan. Visit www.startech.