WHDI Wireless HD Extender - 1080p Wireless High Definition ST121WHD *actual product may vary from photos DE: Bedienungsanleitung - de.startech.com FR: Guide de l'utilisateur - fr.startech.com ES: Guía del usuario - es.startech.com IT: Guida per l'uso - it.startech.com NL: Gebruiksaanwijzing - nl.startech.com PT: Guia do usuário - pt.startech.com For the most up-to-date information, please visit: www.startech.
FCC Compliance Statement This equipment has been tested and found to comply with the limits for a Class B digital device, pursuant to part 15 of the FCC rules. These limits are designed to provide reasonable protection against harmful interference in a residential installation. This equipment generates, uses and can radiate radio frequency energy and, if not installed and used in accordance with the instructions, may cause harmful interference to radio communications.
Table of Contents Introduction.............................................................................................1 Packaging Contents.................................................................................................................................. 1 System Requirements............................................................................................................................... 1 Preparing Your Site...................................................................
Introduction The ST121WHD Wireless Video, Audio and IR Extender lets you connect a remote HD display or projector up to 30m (100ft) away from the HD source wirelessly. The ST121WHD is a bundled kit that includes both a local and a remote unit providing a complete end to end solution for a single source to display connection. This wireless HD extender eliminates the need for expensive cable infrastructure, and provides a wireless solution where cabling is undesirable, i.e.
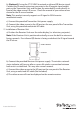
Preparing Your Site 1. Determine where the local video source (i.e. computer, Blu-ray Player) will be located and set up the device. 2. Determine where the remote display will be located and place/ mount the display appropriately. Notes: This product includes optional bases allowing for horizontal or veridical positioning. It is recommended that both the Transmitter Unit and the Receiver Unit be positioned in the same fashion.
b) (Optional) If using the ST121WHD to extend an infrared (IR) device signal. Connect the IR remote extension connector to the IR remote signal output port on the Transmitter Unit, and Position the extended IR sensor directly in front of the video source’s IR sensor. Check the manual of your video source device for the IR sensor location. Note: This product can only supports an IR signal in 38 kHz carrier modulation mode. c) Connect the provided Transmitter Unit power supply.
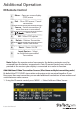
Additional Operation IR Remote Control 1 Menu – Open on screen display (OSD) menu 2 Exit – Close OSD menu / Cancel connection 3 Source – Switch transmitters (If more than one is connected) 4 – Move Cursor 5 OK – Select OSD option 6 Delete – Delete a Transmitter 7 Add – Add a Transmitter 8 Guest – Power On/Off 9 Input Devices – Select to switch between added Transmitters Note: Before the remote control can operate, the battery protector must be removed from the battery compartment.
2. Please Activate Registration on Transmitter Unit will now appear on the display. Physically return to the transmitter unit hold down the reset button on the transmitter for 3 seconds to activate registration. 3. The additional transmitter is now registered. This action can be performed for up to 2 additional transmitters for a total of 3. Remove Video Transmitters (Must have multiple transmitting units) 1. Using the IR remote control, Press MENU - > Select Remove Video Source 2.
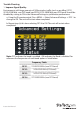
Trouble Shooting 1. Improve Signal Quality Environments with large amounts of 5GHz wireless traffic (such as an office), DFS1 (5150-5250 MHz -non DFS band) and DFS4 (5725-5850 MHz-non DFS band) should be disabled by setting to ON in the Advanced Settings to yield better performance. a. Using the IR remote control, Press MENU- > Select Advanced Settings -> DFS 1 to change to ON. The unit will restart when completed. b. Repeat step (a) this time selecting DFS 4 to ON. The unit will restart when completed.
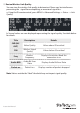
2. Review Wireless Link Quality You can view the wireless link quality to determine if there may be interference preventing the signal from completing, or occasional signal loss. a. Using the IR remote control, press MENU-> Advanced Settings -> Status - > Link Quality b. Several values are now displayed representing the signal quality. See table below for details. Title Description Details SNR (IN/. OUT) Video Quality Values above 20 are ideal.
LED Indicator Status Table Indicator LED Activity Status On (Green) The transmitter is connected successfully in the wireless mode Off The transmitter has failed to connect in the wireless mode Flash rapidly The Device is faulty On (Green) The video source is connected successfully Off The video source has failed to connect On (Green) The Receiver is connected successfully in the wireless mode Off The transmitter has failed to connect in the wireless mode Flash Rapidly The Device is faulty
Technical Support StarTech.com’s lifetime technical support is an integral part of our commitment to provide industry-leading solutions. If you ever need help with your product, visit www.startech.com/support and access our comprehensive selection of online tools, documentation, and downloads. For the latest drivers/software, please visit www.startech.com/downloads Warranty Information This product is backed by a two year warranty. In addition, StarTech.
Hard-to-find made easy. At StarTech.com, that isn’t a slogan. It’s a promise. StarTech.com is your one-stop source for every connectivity part you need. From the latest technology to legacy products — and all the parts that bridge the old and new — we can help you find the parts that connect your solutions. We make it easy to locate the parts, and we quickly deliver them wherever they need to go. Just talk to one of our tech advisors or visit our website.