
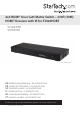
Instruction manual


Instruction Manual
5
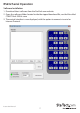
Note: If you are using surface cabling, ensure you have enough Category 5e
unshielded twisted pair (UTP) network cabling to connect the Matrix switch
to the Receiver Unit’s location, and that each end is terminated with a RJ45
connector. The cabling should not go through any networking equipment (i.e.
router, switch).
OR
If you are using premises cabling, ensure that the Category 5 unshielded twisted
pair (UTP) network cabling between the Host Unit and the Remote Unit has been
properly terminated in a wall outlet in each location and there is a patch cable
long enough to connect the Remote Unit and the Host Unit to their respective
outlets. The cabling should not go through any networking equipment (i.e. router,
switch).
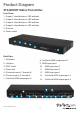
b) Connect the other end of each Cat5e/6 cable run to the Link port (RJ-45 Connector)
on the connector on the remote STHDBTRX Receiver Units (sold separately).
3. Install STHDBTRX Receiver Units (sold separately).
a) Position each Receiver Unit near the video display (i.e. television, projector).
b) Connect an HDMI cable (not included) from the Receiver unit to the video input
port on the remote display device (i.e Television/Projector).
c) (Optional) If using the Matrix switch to transmit an infrared (IR) device signal,
and the device receiving the IR signal is on the Transmitter side. Connect the IR
Transmitter Cable to the IR-Transmitter port on the Receiver unit, and position the
IR sensor where the remote control will point. If the device receiving the IR signal
is on the Transmitter side, connect the IR Receiver Cable to the IR-Receiver port,
and position the extended IR sensor directly in front of the video source’s IR sensor.
Check the manual of your video source device for the IR sensor location.
d) Connect the power adapter from an available power outlet to the power jack on the
Receiver unit.
e) Repeat these steps for each STHDBTRX Receiver Unit.
4. (Optional For remote serial control) Connect a straight through DB9 serial
cable (not included) from the LAN port on the back of the ST424HDBT to
your network device (Router/Network Switch/PC.
5. (Optional For remote IP control) Connect a CAT5e/6 cable (not included)
from the LAN port on the back of the ST424HDBT to an available COM port
on your computer.
6. Hardware installation is now complete.