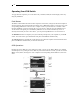
KVM SWITCH SV831HD SV1631HD SV1631D1U Instruction Guide * SV831HD shown * Actual product may vary from photo The Professionalsí Source For Hard-to-Find Computer Parts
Table of Contents Introduction ................................................................................................2 System Requirements ................................................................................2 Installation ..................................................................................................3 Operating Your KVM Switch.......................................................................4 Pushbuttons ..........................................................
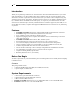
2 Introduction Thank you for purchasing a StarTech.com 1U KVM switch. Our universal KVM switches let you control either 8 (SV831HD) or 16 (SV1631HD) USB or PS/2 computers using only one PS/2 keyboard, mouse, and monitor. Our slim 16-port PS/2 switch (SV1631D1U) lets you connect 16 PS/2 computers using only one PS/2 keyboard, mouse, and monitor. Switching between your PCs is easy thanks to pushbutton or hotkey commands.
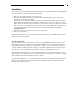
3 Installation This section will guide you through the hardware installation of your KVM switch. Please read through this section carefully and complete each step in the order listed. 1. 2. 3. 4. 5. Make sure all computers and devices are powered off. Plug a PS/2 keyboard, PS/2 mouse, and monitor into the labelled keyboard, mouse, and monitor Console ports on the back of the KVM. Attach each of your managed computers to your StarView KVM switch’s PC ports using ultra-thin KVM cables.
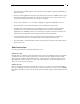
4 Operating Your KVM Switch To toggle between computers, you can use the hot-key commands, OSD (On-Screen Display) menu or by using the pushbuttons. Push Buttons The LEDs on the KVM switch indicate which computers are turned on (solid green) and which computer is selected (solid red). The indicator flashes red when in Auto or Manual Scan mode. You can press any of the corresponding pushbuttons to select the active computer.
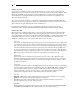
5 • The port number (or channel address) of the currently selected computer is displayed in red in the top right of the screen. • The device name is green if the device has power and is ready for selection or white if it has no power. The OSD menu automatically updates the color when it is activated. On the 16-port models, use the and keys to view the other 8 computers. • Use the , , 1~8, or A~H keys to highlight a computer and to select it.
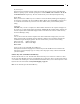
6 Function key Locks a device (a computer or a Slave) from unauthorized access. To lock a device, use the and arrow keys to highlight it, then press . Now, enter up to 4 characters (A to Z, 0 to 9, dash) followed by as new password. A Security-enabled device is marked with a lock beside its channel number. To permanently disable the security function from a locked device, highlight it, press then enter the password.
7 Keyboard Speed StarView offers a keyboard typematic setting that overrides the typematic settings in the BIOS and Windows operating system. Available speed options are Low, Middle, Fast and Faster as 10, 15, 20 and 30 characters/sec respectively. The non-volatile memory stores the Keyboard Speed setting. Hotkey Menu When you hit the left key twice within two seconds, the Hotkey Menu appears displaying a list of hot-key commands if the option is On.
8 Hot Key Commands A hot key command is a short keyboard sequence to select a computer, activate a computer scan, etc. A hot-key sequence starts with two Left Control keystrokes followed by one or two more keystrokes. A built-in buzzer generates a high-pitched beep for correct hot-key sequences and a low-pitched beep for errors or bad key combinations that will not be carried out.
9 Scan Rate Scan Rate sets the duration between switching to the next computer in Auto Scan mode: left Ctrl + left Ctrl + F3 The StarView gives off one to four beeps indicating scan interval of 3, 8, 15 and 30 seconds respectively. Keyboard Typematic Rate You can adjust the keyboard typematic rate (given in characters/sec). This setting over-rides the keyboard typematic rate of your BIOS and any operating system.
10 Keyboard Mapping (SV831HD, SV1631HD only) These KVMs are able to emulate a Sun keyboard and mouse when a computer is marked with a Sun in OSD menu by Function key . A Sun keyboard has more keys than a standard PS/2 keyboard. These extra keys are simulated by tapping the lower-right Ctrl followed by one of the function keys on the PS/2 keyboard (i.e. combo key). For instance, tap the lower-right Ctrl key, and then tap the function key F7 to activate Open for a Sun computer.
11 Troubleshooting If you are experiencing trouble with your devices, first make sure that all cables are connected to their proper ports and are firmly seated. You may also want to try resetting the devices by pressing and holding the front-panel 1 and 2 pushbuttons. Mouse does not work. • Make sure there is only one mouse driver installed in each computer. Monitor works, but keyboard and mouse do not. • Make sure you haven’t swapped the keyboard and mouse cables VGA image is not clear.
12 Technical Specifications SV831HD SV1631HD SV1631D1U User ports 1 1 1 Computer ports 8 16 16 Up to 64 Up to 136 Up to 136 2-in-1 USB KVM 3-in-1 PS/2 KVM 2-in-1 USB KVM 3-in-1 PS/2 KVM 3-in-1 PS/2 KVM Front panel control 8 16 16 Hot plug and play Yes Yes Yes Hot key control Yes Yes Yes Rack mountable 19” industry standard 19” industry standard 19” industry standard 3, 8, 15, 30 seconds 3, 8, 15, 30 seconds 3, 8, 15, 30 seconds Yes Yes Yes Up to 14 characters Up to 1
13 Technical Support The following technical resources are available for this StarTech.com product: On-line help: We are constantly adding new information to the Tech Support section of our web site. To access this page, click the Tech Support link on our homepage, www.startech.com. In the tech support section there are a number of options that can provide assistance with this card.
November 3, 2003