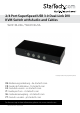
2/4 Port SuperSpeed USB 3.0 Dual-Link DVI KVM Switch with Audio and Cables SV231DLU3A / SV431DLU3A *actual product may vary from photos DE: Bedienungsanleitung - de.startech.com FR: Guide de l'utilisateur - fr.startech.com ES: Guía del usuario - es.startech.com IT: Guida per l'uso - it.startech.com NL: Gebruiksaanwijzing - nl.startech.com PT: Guia do usuário - pt.startech.com For the most up-to-date information, please visit: www.startech.
FCC Compliance Statement This equipment has been tested and found to comply with the limits for a Class B digital device, pursuant to part 15 of the FCC Rules. These limits are designed to provide reasonable protection against harmful interference in a residential installation. This equipment generates, uses and can radiate radio frequency energy and, if not installed and used in accordance with the instructions, may cause harmful interference to radio communications.
Table of Contents Product Diagram.....................................................................................1 Front View - SV231DLU3A....................................................................................................................... 1 Rear View ...................................................................................................................................................... 1 Front View - SV431DLU3A.............................................................
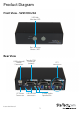
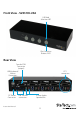
Product Diagram Front View - SV231DLU3A USB Hub Selection LED Port Selection Button / LED Rear View USB Keyboard/ Mouse Connectors DC Power Connector Instruction Manual Console DVI-I Connector (output) PC1 connectors 3.5mm Audio Speaker/Mic USB 3.
Front View - SV431DLU3A USB Hub Selection LED Port Selection Button / LED Rear View Console DVI-I Connector (output) PC1 connectors USB Keyboard/ Mouse Connectors DC Power Connector Instruction Manual USB 3.0 HUB connectors 3.
Introduction Packaging Contents SV231DLU3A • 1 x 2 Port USB 3.0 KVM Switch • 2 x DVI-D M/M Cables • 2 x USB 3.0 A-B Cables • 2 x 3.5mm Audio/Mic Cables • 1 x Universal Power Adapter (NA/ UK/ EU) • 1 x Instruction Manual SV431DLU3A • 1 x 4 Port USB 3.0 KVM Switch • 4 x DVI-D M/M Cables • 4 x USB 3.0 A-B Cables • 4 x 3.5mm Audio/Mic Cables • 1 x Universal Power Adapter (NA/ UK/ EU) • 1 x Instruction Manual System Requirements • One DVI display device (i.e. monitor, projector, TV, etc.
Installation Hardware Installation 1. Connect a DVI monitor into the Console’s DVI connector; plug a USB keyboard and a USB mouse into the dedicated USB keyboard and mouse ports on the KVM switch. If using audio, also connect speakers with 3.5mm mini-jack plugs. 2. Use a male-to-male DVI-D video cable to connect the DVI connector on the computer’s video card, to the DVI ports for one of the KVM’s PC ports (i.e. PC1). 3.
Operation Front Panel The front-panel Smart Touch button allows you a direct control over KVM switching operation. Simply press the button to switch to the respective PC port. For more operation about Smart Touch button, please refer to “Quick Reference Sheet”. Hotkey Control A Hotkey command is a short keyboard sequence for selecting a computer, activating computer scan, etc. A hotkey sequence starts with two left keystrokes (successively within 2 seconds) followed by one or two more keystrokes.
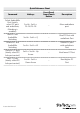
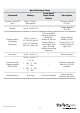
Quick Reference Sheet Command Hotkeys Front-Panel Smart Touch Button Description Select Audio&Mic Port (Jointly select PC port and audio&mic, if binding is enabled) ScrLk + ScrLk + F5~F6/F5~F8 -- Move audio&mic port Bind PC and Audio&Mic Switching ScrLk + ScrLk + Q -- Bind PC Port with audio&mic Port Unbind PC and Audio&Mic Switching ScrLk + ScrLk + W -- Unbind PC port with audio&mic Port Previous PC port (Jointly select PC/ hub port control) ScrLk + ScrLk + Up Arrow -- Next lower PC Port
Quick Reference Sheet Command Hotkeys Front-Panel Smart Touch Button Description Previous active PC port ScrLk + ScrLk + [Backspace] -- Previous active PC Port Beeper ScrLk + ScrLk + B -- Toggle Beeper On/Off ScrLk + ScrLk + H+ [ScrLk/CapsLk/ Esc/F12/ NumLk/ left Ctrl/ right Ctrl] Press and hold down last button (Button 2/ Button 4) till two beeps. Release the button, and press desired hotkey preceding sequence.
Specifications SV231DLU3A SV431DLU3A 1 x DVI-1 (29 pin) Female Console Connectors 2 x USB A (4 pin) Female 2 x 3.5mm Mini-Jack (3 Position) Female Computer Connectors (per port) Other Interfaces 1 x DVI-1 (29 pin) Female 1 x USB 3.0 B (9pin; SuperSpeed) Female 2 x 3.5mm Mini-Jack (3 Position) Female 2 x USB 3.
Technical Support StarTech.com’s lifetime technical support is an integral part of our commitment to provide industry-leading solutions. If you ever need help with your product, visit www.startech.com/support and access our comprehensive selection of online tools, documentation, and downloads. For the latest drivers/software, please visit www.startech.com/downloads Warranty Information This product is backed by a two year warranty. In addition, StarTech.
Hard-to-find made easy. At StarTech.com, that isn’t a slogan. It’s a promise. StarTech.com is your one-stop source for every connectivity part you need. From the latest technology to legacy products — and all the parts that bridge the old and new — we can help you find the parts that connect your solutions. We make it easy to locate the parts, and we quickly deliver them wherever they need to go. Just talk to one of our tech advisors or visit our website.