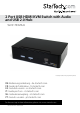
2 Port USB HDMI KVM Switch with Audio and USB 2.0 Hub SV231HDMIUA *actual product may vary from photos DE: Bedienungsanleitung - de.startech.com FR: Guide de l'utilisateur - fr.startech.com ES: Guía del usuario - es.startech.com IT: Guida per l'uso - it.startech.com NL: Gebruiksaanwijzing - nl.startech.com PT: Guia do usuário - pt.startech.com For the most up-to-date information, please visit: www.startech.
FCC Compliance Statement This equipment has been tested and found to comply with the limits for a Class B digital device, pursuant to part 15 of the FCC Rules. These limits are designed to provide reasonable protection against harmful interference in a residential installation. This equipment generates, uses and can radiate radio frequency energy and, if not installed and used in accordance with the instructions, may cause harmful interference to radio communications.
Table of Contents Introduction.............................................................................................1 Packaging Contents.................................................................................................................................. 1 System Requirements............................................................................................................................... 1 Installation..........................................................................
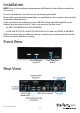
Introduction The SV231HDMIUA 2-port USB HDMI® KVM Switch lets you control two USB-enabled multimedia computers or devices with HDMI video interfaces, using a single peripheral set/console (USB keyboard, mouse, monitor, speakers and microphone). A highly versatile KVM solution, the USB HDMI KVM Switch features an integrated 2-port USB 2.0 hub that lets selected computers access shared high speed USB devices, eliminating the cost of duplicate USB peripheral purchases.
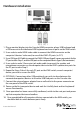
Installation NOTE: Prior to the installation, please power off all devices that will be connected to this system. Ensure that all devices you will connect are properly grounded. Place cables away from fluorescent lights, air conditioners, and machines that are likely to generate electrical noise. If you experience any problems using a USB KVM switch, the following BIOS setup changes may be necessary for PC users (not necessary for Mac users): • Set HALT ON ERROR to ALL BUT KEYBOARD.
Hardware Installation *Console setup 1. Plug a monitor/display into the Console HDMI connector; plug a USB keyboard and a USB mouse into the dedicated USB keyboard and mouse ports on the KVM switch. 2. Use a male-to-male HDMI video cable to connect the HDMI connector on the computer’s/devices’ video card, to one of the KVM’s PC ports (ie. PC1) 3.
Driver Installation No driver installation is required for the KVM switch, as the keyboard and mouse use generic USB keyboard/mouse drivers that are already installed on any operating system that fully supports USB. Operation Front Panel Port Selection/Link LED The LED turns green when the connected computer is powered-on. The corresponding LED will also illuminate red when that PC port is currently selected.
HotKey Control A Hotkey command is a short keyboard sequence for selecting a computer, activating computer scan, etc. A hotkey sequence starts with two left keystrokes (successively within 0.2 seconds) followed by one or two more keystrokes. A built-in tone generator creates a high-pitch beep for correct hotkey command; otherwise, one low-pitch beep is generated for errors and the bad key sequence will not be forwarded to the selected computer.
Manual Scan allows users to manually switch back and forth between powered-on computers. Left + Left + To select the previous or the next computer, press or arrow keys. To abort the Manual Scan, press any other key. Scan Time Four options are available for users to set the Scan Time duration, it Includes 3, 8, 15 and 30 seconds. Note: Scan Time is set to 3 seconds by default.
Alternative Hotkey Commands In addition to the Left + Left hotkeys, there are two alternative hotkey sequences available. 1. For the following operations, users may press twice instead of pressing left twice. To select a computer: + + <1> (Example: Select the computer at port 1.) + + <2> (Example: Select the computer at port 2.) NOTE: Do not use the keypad at the right of the keyboard. 2.
Change Leading Hotkey The default leading hotkey sequence involves pressing the left twice in succession (e.g. left + left ). This can be changed to the right key instead, to avoid accidental activation due to using the left key for functions such as Copy/Paste.
Specifications Number of Ports 2 1 x HDMI Computer Connectors (per port) 1 x USB type B 2 x 3.5mm mini-jack 1 x HDMI Console Connectors 4 x USB type A 2 x 3.5mm mini-jack Maximum Video Resolution 1920x1200 DDC2B Support Yes Audio Support Yes On Screen Display No Cascadable No Switching Modes Front Panel Button, Hot-Keys Power Adapter 9-12VDC, 1.5A, type N plug, center positive Enclosure Material Metal Dimensions (WxHxD) 160.8mm x 40.0mm x 100.
Technical Support StarTech.com’s lifetime technical support is an integral part of our commitment to provide industry-leading solutions. If you ever need help with your product, visit www.startech.com/support and access our comprehensive selection of online tools, documentation, and downloads. For the latest drivers/software, please visit www.startech.com/downloads Warranty Information This product is backed by a three year warranty. In addition, StarTech.
Hard-to-find made easy. At StarTech.com, that isn’t a slogan. It’s a promise. StarTech.com is your one-stop source for every connectivity part you need. From the latest technology to legacy products — and all the parts that bridge the old and new — we can help you find the parts that connect your solutions. We make it easy to locate the parts, and we quickly deliver them wherever they need to go. Just talk to one of our tech advisors or visit our website.