Video Capture Cable with Composite and S-Video Input SVID2USB2NS *actual product may vary from photos DE: Bedienungsanleitung - de.startech.com FR: Guide de l'utilisateur - fr.startech.com ES: Guía del usuario - es.startech.com IT: Guida per l'uso - it.startech.com NL: Gebruiksaanwijzing - nl.startech.com PT: Guia do usuário - pt.startech.com For the most up-to-date information, please visit: www.startech.
FCC Compliance Statement This equipment has been tested and found to comply with the limits for a Class B digital device, pursuant to part 15 of the FCC Rules. These limits are designed to provide reasonable protection against harmful interference in a residential installation. This equipment generates, uses and can radiate radio frequency energy and, if not installed and used in accordance with the instructions, may cause harmful interference to radio communications.
Table of Contents Introduction.............................................................................................1 Installation...............................................................................................2 Driver Installation....................................................................................................................................... 2 Application Installation.................................................................................................
Introduction The SVID2USB2NS USB 2.0 S-Video and Composite video Capture Cable lets you connect devices that output S-Video or Composite video to a computer, through an available USB 2.0 port. The perfect solution for bridging a computer and an S-Video or Composite video source, the capture cable offers real time MPEG 1, MPEG 2 and MPEG 4 recording.
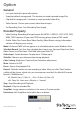
Installation USB 2. 0 connector Composite input S-Video input USB 2.0 connector: Connect to USB 2.0 port of your computer S-Video input: S-Video input from external A/V device (e.g. VCR) Composite video input: Composite video input from external A/V Device (e.g. VCR) * If you want capture audio, please connect audio directly to Line-in of your Sound card.
Application Installation 1. Please insert “Multimedia Installation Kit” CD-ROM into your CDROM drive; AutoRun will play; (if AutoRun does not run, please go to “My Computer” and double click the CD-ROM drive). 2. From the menu, please select the “GrabBeeX-light” product. 3. Please select “Application Software” on the next screen. 4. Please select “GrabBee”. 5. Welcome to the InstallShield wizard; Click “Next”. 6. Select the language you will use for GrabBee; then click “Set”. 7.
After the AP software is installed, three icons will now be shown on screen: GrabBee : GrabBee software main program Record Files : Click to see your record fi les Snapshot : Click to see your capture still image fi les Hardware Installation After the computer restarts, please plug the SVID2USB2NS device into the computer’s USB 2.0 port; System will now detect the new device and install it automatically. Please check whether the SVID2USB2NS driver was installed successfully in your computer.
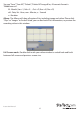
Option General • Lists your hard disk space information. • Snapshot default storage path : The location to saved captured image fi les. • Clip default storage path : Location to saved recorded video fi les. • Video Format : Choose your correct video format input. • Set Recording Time : Sets Recording Time length.
You can “Save”, “Save All”, “Delete”, “Delete All” image fi les, fi le name’s format is “Mddhhmmssn”. M : Month (Jan->1, Feb->2….Oct->O, Nov->N, Dec->D) dd : Date; hh : Hour; mm : Minute; ss : Second n : Number Album: The Album will show all capture fi les including image and video. Please click “Clips” or “Images” to fi nd all listed; you can find each fi le’s information, or preview the recording video in this window.
Troubleshooting Q1 : Why can’t my system detect the SVID2USB2NS? A1 : Check that you’ve enabled USB 2.0 in the motherboard BIOS setup. Please make sure that your system has the latest USB 2.0 host driver. For Windows® XP, please upgrade to Service Pack 2 or above. For Windows® 2000, please upgrade to Service Pack 3 or above.
Q7 : How can I get a minimum number of dropped frames during video capture? A7 : The best recording performance depends on your computer system performance, but you can also take some steps described below to improve your performance. • Try lowering the resolution format you record in. • Enable hard disk drive DMA ; Go to My Computer->Control Panel ->System>Hardware->Device Manager->Disk drives to setup. • Try and make more available free space on the hard disk drive.
Specifications Video Input 1x RCA composite, 1x S-Video Audio Input None Video System NTSC, PAL, SECAM Video Format MPEG (720x480@NTSC, 720x576@PAL), MPEG4 (320x240), AVI (352x288, 352x240, 320x240) Still Image Format JPG, BMP, TIFF Performance 25 FPS @ 720x576 (PAL), 30 FPS @ 720x480 (NTSC) Power 5VDC, 350mA (max) through USB Operating System Support Windows® 2000/XP/7/Vista Instruction Manual 9
Technical Support StarTech.com’s lifetime technical support is an integral part of our commitment to provide industry-leading solutions. If you ever need help with your product, visit www.startech.com/support and access our comprehensive selection of online tools, documentation, and downloads. For the latest drivers/software, please visit www.startech.com/downloads Warranty Information This product is backed by a two year warranty. In addition, StarTech.
Hard-to-find made easy. At StarTech.com, that isn’t a slogan. It’s a promise. StarTech.com is your one-stop source for every connectivity part you need. From the latest technology to legacy products — and all the parts that bridge the old and new — we can help you find the parts that connect your solutions. We make it easy to locate the parts, and we quickly deliver them wherever they need to go. Just talk to one of our tech advisors or visit our website.