4x4 HDMI Matrix Video Switch Splitter with RS232 VS440HDMI *actual product may vary from photos DE: Bedienungsanleitung - de.startech.com FR: Guide de l'utilisateur - fr.startech.com ES: Guía del usuario - es.startech.com IT: Guida per l'uso - it.startech.com NL: Gebruiksaanwijzing - nl.startech.com PT: Guia do usuário - pt.startech.com For the most up-to-date information, please visit: www.startech.
FCC Compliance Statement This equipment has been tested and found to comply with the limits for a Class B digital device, pursuant to part 15 of the FCC Rules. These limits are designed to provide reasonable protection against harmful interference in a residential installation. This equipment generates, uses and can radiate radio frequency energy and, if not installed and used in accordance with the instructions, may cause harmful interference to radio communications.
Table of Contents Introduction.............................................................................................1 Packaging Contents.................................................................................................................................. 1 System Requirements............................................................................................................................... 1 Front View.............................................................................
Introduction The VS440HDMI 4x4 HDMI Matrix Video Switch Splitter with Audio and RS232 allows you to share up to four distinct HDMI or DVI inputs (Using HDMI to DVI adapters - not included) with audio between four independent displays or projectors.
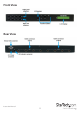
Front View Rear View Instruction Manual 2
Installation Hardware Installation 1. Make sure that all devices are powered off before beginning installation. 2. Connect the HDMI display device(s) to the HDMI Output connectors on the rear of the matrix switch. 3. Connect the HDMI video source device(s) to the HDMI Input connectors on the rear of the matrix switch. 4. OPTIONAL: If planning to use RS232 control for the matrix switch, connect a DB9 RS232 cable from the rear of the matrix switch, to the RS232 port on the host computer system. 5.
How to Use Front Panel OUT 1~4: Selects the numbered Output Port to be configured. An output must be selected before selecting an input. IN 1~4: Selects the numbered Input Port to map to an Output Port. Should only be used after an Output Port has been selected first, otherwise an error message will be generated on the LCD status display. ALL: Selects all of the Output ports at once. Used to configure all output ports simultaneously with the same setting.
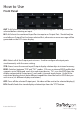
Software Once the software is installed and the matrix switch is properly connected to the host computer, launch the AV Matrix software to bring up the main control panel. The panel on the left side will list all compatible matrix switches that are connected to the host computer system. The name/model, number of ports will also be listed. The center panel displays a grid showing the current Input-to-Output relationships for the selected matrix switch.
Options: Used to configure the serial port on the computer, if necessary. Selecting Video Output Mapping the “Output” ports to an “Input” port can be accomplished through one of two methods Method 1: 1. Ensure the “Video” checkbox is checked in the bottom right corner of the center panel. 2. Click on the appropriate location on the grid to map the numbered “Output” port to a numbered “Input” port. Method 2: 1. Ensure the “Video” checkbox is checked in the bottom right corner of the center panel. 2.
Troubleshooting If switching input/output with the front panel keys are not responsive. • Press and hold the key for 2 seconds, then release, instead of just a quick press. Loss of video output or color, or the unit becomes unusually hot. • If the signal voltage difference between the video source device(s) and the matrix switch is too large, hot plugging could easily cause damage to the IC chips. Please turn off power to the system before plugging or unplugging.
Specifications Video Signal High Speed HDMI (HDMI 1.3) Number of Inputs 4 Number of Outputs 4 4 x HDMI type A female (input) 4 x HDMI type A female (output) External Connectors 1 x DB9 female 1 x IR Extender connector 1 x DC Power LEDs N/A Maximum Video Resolution 1080p / 1920x1200 Maximum Cable Length 10m / 32.
Technical Support StarTech.com’s lifetime technical support is an integral part of our commitment to provide industry-leading solutions. If you ever need help with your product, visit www.startech.com/support and access our comprehensive selection of online tools, documentation, and downloads. For the latest drivers/software, please visit www.startech.com/downloads Warranty Information This product is backed by a two year warranty. In addition, StarTech.
Hard-to-find made easy. At StarTech.com, that isn’t a slogan. It’s a promise. StarTech.com is your one-stop source for every connectivity part you need. From the latest technology to legacy products — and all the parts that bridge the old and new — we can help you find the parts that connect your solutions. We make it easy to locate the parts, and we quickly deliver them wherever they need to go. Just talk to one of our tech advisors or visit our website.