Wireless Display Adapter for Mobile Devices WIF2HDMC / WIFI2HDMCGE *actual product may vary from photos DE: Bedienungsanleitung - de.startech.com FR: Guide de l'utilisateur - fr.startech.com ES: Guía del usuario - es.startech.com IT: Guida per l'uso - it.startech.com NL: Gebruiksaanwijzing - nl.startech.com PT: Guia do usuário - pt.startech.com For the most up-to-date information, please visit: www.startech.
FCC Compliance Statement This equipment has been tested and found to comply with the limits for a Class B digital device, pursuant to part 15 of the FCC Rules. These limits are designed to provide reasonable protection against harmful interference in a residential installation. This equipment generates, uses and can radiate radio frequency energy and, if not installed and used in accordance with the instructions, may cause harmful interference to radio communications.
Table of Contents Product Diagram.....................................................................................1 Side View....................................................................................................................................................... 1 Back View...................................................................................................................................................... 1 Introduction......................................................
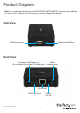
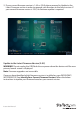
Product Diagram Note: It is recommended the device WIFI2HDMC/WIFI2HDMCGE firmware be updated to version 2.0.2.
Introduction Packaging Contents • Wireless Display Adapter (WIFI2HDMC/WIFI2HDMCGE) • Universal Power Adapter (NA/UK/EU) • USB Cable to Power Adapter Port (optional for USB Power source) • 4 position A/V cable • Software Installation Disc • Quick Installation Guide System Requirements • HDMI-enabled display device w/ cabling (i.e. television, projector) • WiDi, Miracast, or 802.11n/g Wireless-enabled video source device (i.e.
Installation 1. Using an HDMI cable (not included), connect the HDMI-out port on the WIFI2HDMC/WIFI2HDMCGE to the HDMI-in port on your HDMI-enabled display device. 2. Using the included power adapter, connect the power adapter port on your WIFI2HDMC/WIFI2HDMCGE to an available power outlet. or Using the included USB power cable, connect the power adapter port on your WIFI2HDMC/WIFI2HDMCGE to an available USB power source. 3.
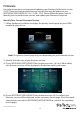
Firmware For optimal operation we recommend updating your firmware to the latest version (2.0.2). There are three possible firmware versions that may be loaded on your WIFI2HDMC/WIFI2HDMCGE (1.6.5 / 2.0.0 / 2.0.2). Please follow the below steps to identify your current firmware version, and update your firmware if required. Identify Your Current Firmware Version 1. Follow Hardware Installation to display the primary launch page on your HDMIenabled display device.
3. If your current firmware version is 1.6.5 or 2.0.0, please proceed to Update to the Latest Firmware section in order to upgrade your firmware to the latest version. If your current firmware version is 2.0.2, no firmware update is required. Update to the Latest Firmware Version (2.0.2) WARNING! Do not unplug the USB flash drive or power down the device until the new primary launch screen is displayed.
Update from Version 1.6.5 1. Download the firmware update files from StarTech.com. 2. Unzip the compressed file. 3. Copy install.img and install_sp.img from the downloaded folder to the root directory (the parent/top directory) of the USB flash drive. 4. Ensure the WIFI2HDMC/WIFI2HDMCGE is powered off. 5. Plug the USB flash drive into the USB Media Input on the WIFI2HDMC. 6. Hold down the mode select button and turn on the WIFI2HDMC/WIFI2HDMCGE by pressing the power button.
Update from Version 2.0.0 1. Download the firmware update files from StarTech.com. 2. Unzip the compressed file. 3. Copy install_sp.img from the downloaded folder to the root directory (the parent/top directory) of the USB flash drive. 4. Once the file has been moved to your USB flash drive, rename install_sp.img file to install.img. 5. Ensure the WIFI2HDMC/WIFI2HDMCGE is powered off. 6. Plug the USB flash drive into the USB Media Input on the WIFI2HDMC. 7.
8. Release the mode select button after the “Please wait for USB update” appears on your HDMI-enabled display device. The firmware on your WIFI2HDMC/WIFI2HDMCGE will now update.
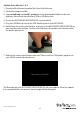
Wirelessly Connect using a Miracast-enabled Smartphone or Tablet 1. Set WIFI2HDMC/WIFI2HDMCGE to WiDi/Miracast mode. Press the mode select button until the WiDi / Miracast launch page is displayed. 2. Connect to the WIFI2HDMC using your Miracast-enabled smartphone or tablet. NOTE: Exact steps regarding Miracast setup will vary depending on your device. Please review the documentation included with your smartphone or tablet for steps specific instructions.
3. Scroll through the list and select “AllShare Cast” or “Screen Mirror” (depending on your version of Samsung device).
4. Turn AllShare Cast ON and select the device name from the list. By default WIFI2HDMC will be listed as the device name. Tap the device to connect. The smartphone or tablet screen will now be shared on your HDMI-enabled display device. Android Nexus Device 4.2 or Higher 1. Open the “Settings” menu. 2. Select “Display.
3. Select “Wireless display” or “Cast screen” (depending on your version of Android). 4. Turn “Wireless display” ON and select the device name from the list. By default WIFI2HDMC will be listed as the device name. Tap the device to connect. The smartphone or tablet screen will now be shared on your HDMI-enabled display device. Wirelessly Connect using a WiDi-enabled Computer with Intel® WiDi App Note: If your computer system is running Windows 8.
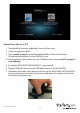
2. Launch the WiDi application that is pre-installed on your Wi-Di-enabled computer system. 3. Select WIFI2HDMC from the listed devices below the detected adapters list. 4. Click the “Connect” button.
The computer screen will now be shared on your HDMI-enabled display device. Wirelessly Connect using a Computer with Windows 8.1 or Higher Note: Please ensure the drivers for your graphics adapter and wireless adapter are up to date. 1. Launch the “Windows 8 Charms Bar” and select “Devices.” 2. Select “Project,” then “Add a wireless display.
3. Select the WIFI2HDMC from the list of devices. 4. If you are prompted for a PIN code, enter the PIN code that pops up on the WIFI2HDMC screen and click “Next”. The computer screen will now be shared on your HDMI-enabled display device. For full operational instructions including standard Wi-Fi and LAN screen sharing, please download the full product manual at StarTech.com.
Technical Support StarTech.com’s lifetime technical support is an integral part of our commitment to provide industry-leading solutions. If you ever need help with your product, visit www.startech.com/support and access our comprehensive selection of online tools, documentation, and downloads. For the latest drivers/software, please visit www.startech.com/downloads Warranty Information This product is backed by a two year warranty. In addition, StarTech.
Hard-to-find made easy. At StarTech.com, that isn’t a slogan. It’s a promise. StarTech.com is your one-stop source for every connectivity part you need. From the latest technology to legacy products — and all the parts that bridge the old and new — we can help you find the parts that connect your solutions. We make it easy to locate the parts, and we quickly deliver them wherever they need to go. Just talk to one of our tech advisors or visit our website.