WiFi to VGA Wireless Video Extender with Audio WIFI2VGA *actual product may vary from photos DE: Bedienungsanleitung - de.startech.com FR: Guide de l'utilisateur - fr.startech.com ES: Guía del usuario - es.startech.com IT: Guida per l'uso - it.startech.com NL: Gebruiksaanwijzing - nl.startech.com PT: Guia do usuário - pt.startech.com For the most up-to-date information, please visit: www.startech.
FCC Compliance Statement This equipment has been tested and found to comply with the limits for a Class B digital device, pursuant to part 15 of the FCC Rules. These limits are designed to provide reasonable protection against harmful interference in a residential installation. This equipment generates, uses and can radiate radio frequency energy and, if not installed and used in accordance with the instructions, may cause harmful interference to radio communications.
Table of Contents Introduction................................................................................................... 1 Packaging Contents........................................................................................................................................1 System Requirements....................................................................................................................................1 Front View.............................................................
Introduction The WIFI2VGA WiFi to VGA Wireless Video Extender with Audio lets you send a VGA signal with supporting audio wirelessly from your laptop or desktop computer to a remote VGA projector or display up to 180 feet (55 meters) away, at resolutions up to 1440x900.
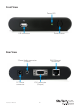
Front View Power LED USB connector Power Button Rear View RJ45 Ethernet connector 3.
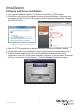
Installation Software and Driver Installation 1. Insert the included installation CD into the computer’s CD/DVD drive. 2. If AutoPlay runs, choose the option to browse/open the folder. Otherwise you can access the files on the CD by going into My Computer and double-clicking the CD/DVD drive. *photos/screenshots for reference only 3. Run the PC2TV application to begin the driver/software installation wizard. 4. Proceed through the installation wizard until the benchmark application runs. 5.
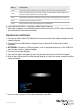
Rating Description 1 Star CPU and graphics performance are below minimum recommended levels. 2 Star Music and Photo viewing and web surfing are acceptable. Video playback at a very low screen resolution may be possible. 3 Star Good Music playback and Photo viewing quality. Video playback may still lag. 4 Star Video playback should be smooth. 5 Star Best performance for video playback and all features. 6. After the benchmark is complete, reboot the computer. 7.
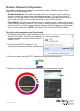
Wireless Network Configuration The video extender can operate in two wireless modes: Wireless Access Point mode (AP) or Client Mode (STA). • AP Mode (default): The video extender will act as a wireless access point (i.e. wireless router) for other wireless enabled computers. This mode is useful if there is no existing wireless network where the video extender will be used, or you do not wish to have the video extender on your main network.
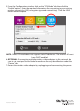
5. From the Configuration window, click on the “STA Mode” tab then click the “Enable” option. Enter the required information for connecting to your existing wireless network (i.e. SSID, encryption type and network key). Click the SAVE button once complete. NOTE: Client/STA mode does not support static IP addresses. The wireless AP must have DHCP enabled. 6.
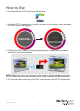
How to Use 1. Double-click the PC2TV icon from the desktop. 2. Once the PC2TV application is ready to connect to the wireless video extender, the “Play” button will appear. 3. Clicking the “Play” button will automatically begin streaming the computer desktop to the remote display. NOTE: Additional users may connect to the wireless video extender at any time. This will cause the currently connected user to be automatically disconnected. 4.
Advanced Settings Advanced Settings can be accessed by clicking on the “Setting” button at the bottom of the PC2TV application window. Click the “Apply” button to set changes. • Device List: Displays the name of the detected wireless video extender(s). If multiple are listed, double-click the one you wish to connect to. • Optimized For: Optimizes the streaming video based on what you will be doing on the host computer.
Web Interface Configuration The web interface for the wireless display adapter can be accessed by clicking the Configuration button in the PC2TV Advanced Setting window. The web interface is divided into several sections that control different settings for the wireless display adapter. • Device: Set the name/identifier for the wireless video extender, for easy identification if multiple extenders are present.
• Overscan: Adjust the overall width and height of the streaming image to better fit on the remote display. • AP Mode/ STA Mode: Select between AP Mode and Client Mode (STA Mode) and set any network settings required for each.
Troubleshooting NetDispLib error pops up when launching the PC2TV application. The SSDP Discovery service is disable or failed to start. 1. To check the SSDP Discovery service, from the main desktop, right-click on “My Computer” (“Computer” in Vista/ 7), then select “Manage”. In the new Computer Management window, select “Service” under the “Service and Applications” heading. 2. Locate SSDP Discovery in the list of services and make sure that it is set to start Automatically.
Poor quality video playback/ choppy video 1. Make sure the optimization for the PC2TV application is set appropriately in the Advanced Setting menu. For video playback, the slider bar should set in the middle, and all the way to “Movie” if problems are still encountered. Click the “Apply” button to confirm the setting. 2. AP Mode: If the “Channel” setting in the web interface is set for Auto, select a permanent channel. 3.
The PC2TV application cannot connect/find the wireless video extender. • Double check that computer is connected to the proper wireless network. The default SSID of the wireless video extender is “PC2TV”. • Check that the Windows Firewall is not blocking the application. Set the PC2TV application as an allowed program if necessary. • If any third-party firewall or anti-virus software is installed, check that the PC2TV application is not being blocked by either.
Specifications Video Signal VGA (RGBHV) 1 x DE-15 VGA female 1 x 3.5mm Audio mini-jack female 1 x USB type A female 1 x RJ45 Ethernet female 1 x DC Power External Connectors LEDs 1 x Power Supported Video Resolutions Standard: 1280x1024, 1280x768, 1024x768, 800x600 Widescreen: 1440x900, 1360x768, 1280x800, 1280x720 Maximum Data Transfer Rate Wireless N: 150 Mbps Audio Support Yes IEEE 802.11n Draft 3.0, IEEE 802.11g, IEEE 802.11b Supported Standards Wireless Operating Frequency 2.
Technical Support StarTech.com’s lifetime technical support is an integral part of our commitment to provide industry-leading solutions. If you ever need help with your product, visit www.startech.com/support and access our comprehensive selection of online tools, documentation, and downloads. For the latest drivers/software, please visit www.startech.com/downloads Warranty Information This product is backed by a two year warranty. In addition, StarTech.
Hard-to-find made easy. At StarTech.com, that isn’t a slogan. It’s a promise. StarTech.com is your one-stop source for every connectivity part you need. From the latest technology to legacy products — and all the parts that bridge the old and new — we can help you find the parts that connect your solutions. We make it easy to locate the parts, and we quickly deliver them wherever they need to go. Just talk to one of our tech advisors or visit our website.