
User Manual


Instruction Manual
29
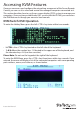
OSD Operations
By hitting the left <CTRL> key twice within two seconds, you may see the ‘Hotkey
Menu’ (unless disabled through OSD menu). Or, by hitting the left <CTRL> key three
times within two seconds, you will see a KVM MENU screen showing a list of the
computers with corresponding channel addresses, names and status.
• The port number (or channel address) of the currently selected computer is
displayed in red in the top right of the screen.
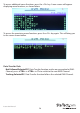
• The device name is green if the device has power and is ready for selection or
white if it has no power. The OSD menu automatically updates the color when it is
activated.
• Use the <UP> and <DOWN> arrow keys to highlight a computer and the <ENTER>
key to select it.
• Press <ESC> to exit the OSD menu and remove the OSD menu from the screen.
• An eye mark (
N
) on the right side of the screen indicates that the computer has
been selected to be monitored in Scan mode. You can switch this mark on and o
using function key <F2>.
• Press <ESC> to exit the OSD and to return to using the selected computer. The
computer name is shown on the screen.
OSD Function Keys
You can use the function keys when the OSD menu is active.
Function key <F1>
Edits the name of a managed computer or a Slave KVM. First, use the <UP> and
<DOWN> arrow keys to highlight a channel then press <F1> followed by name
entry. Each name can be up to 14 characters long. Valid characters are A to Z, 0
to 9, and the dash character. Lowercase letters are converted to uppercase. Press
<BACKSPACE> to delete a letter one at a time. Nonvolatile memory stores all name
entries until you change, even if the unit is powered down.
Function key <F2>
Marks a computer to be scanned by switching the eye mark on or o. First, use the
<UP> and <DOWN> arrow keys to highlight the device, then press <F2> to switch
its eye mark on or o. If Scan Type is Ready PC +
N
(see Function key <F4>), only
the powered and eye-marked (
N
) computers will be displayed in Scan mode.
Function key <F3>
Locks a device (a computer or a Slave) from unauthorized access. To lock a device,
use the <UP> and <DOWN> arrow keys to highlight it, then press <F3>. Now, enter
up to 4 characters (A to Z, 0 to 9, dash) followed by <ENTER> to setup a password.
A Security enabled device is marked with a lock (Ï) beside its channel number. To
permanently disable the security function from a locked device, highlight it, press