Adjustable 4 Post Open Frame Server Rack Actual product may vary from photos User Manual SKU#: 4POSTRACKxU For the latest information and specifications visit www.startech.
Compliance Statements Use of Trademarks, Registered Trademarks, and other Protected Names and Symbols This manual may make reference to trademarks, registered trademarks, and other protected names and/or symbols of third-party companies not related in any way to StarTech.com. Where they occur these references are for illustrative purposes only and do not represent an endorsement of a product or service by StarTech.
Warning Statements • Make sure that you assemble this product according to the instructions. • Do not exceed the weight capacity of this product. Overloading this product might result in injury or property damage. This product can support the following weight: Stationary = 1200 lb. (544 kg) Rolling = 660 lb. (300 kg). • This product is intended for indoor use only and should not be used outdoors. • This enclosure is extremely heavy. Never attempt to move or lift this enclosure without assistance.
• Produkten behöver en jordad anslutning. Använd inte produkten utan en jordad anslutning. Avertissements • Assemblez ce produit conformément aux instructions. • Ne dépassez pas la capacité pondérale de ce produit. Une surcharge de ce produit peut entraîner des dommages corporels ou matériels. Ce produit peut supporter le poids suivant, stationnaire = 544 kg, roulant = 300 kg. • Ce produit est uniquement destiné à une utilisation en intérieur et ne doit pas être utilisé à l’extérieur.
Gehäuse nicht auf einem anderen Gehäuse. • Halten Sie Flüssigkeiten von diesem Gehäuse fern. • Vergewissern Sie sich, dass der Untergrund, auf dem das Gehäuse aufgestellt wird, in der Lage ist, das Gesamtgewicht des Gehäuses und der Geräte, die Sie darin platzieren möchten, zu tragen. • Dieses Produkt erfordert einen Schutzleiteranschluss. Verwenden Sie das Produkt nicht ohne einen Schutzleiteranschluss. Dichiarazioni di avvertenza • Assicurarsi di Assemblare il prodotto secondo le istruzioni.
• • • • probabilidade desta caixa cair. Para evitar este risco, não expandir mais de um componente desta caixa. Não colocar nenhum artigo nesta caixa e não empilhar a caixa em cima de outra caixa. Manter líquidos afastados desta caixa. Certifique-se de que instala a caixa numa área que pode suportar o peso combinado da caixa e o equipamento que pretende colocar dentro da caixa. Este produto requer uma ligação à terra. Não utilize este produto sem uma ligação à terra.
• Deze behuizing is enorm zwaar. Probeer nooit deze behuizing te verplaatsen of op te tillen zonder hulp. • Kantelgevaar! Wanneer meerdere componenten uit deze behuizing steken, bestaat de kans dat deze zal kantelen. Om dit risico te voorkomen, mag niet meer dan één component uit de behuizing steken. • Plaats geen voorwerpen op deze behuizing en stapel de behuizing niet op een andere behuizing. • Houd vloeistof uit de buurt van deze behuizing.
Table of Contents Compliance Statements ........................................................................i Warning Statements ..............................................................................ii Product Diagram ....................................................................................1 Expanded View........................................................................................................................................... 1 Package Contents........................
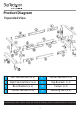
Product Diagram Expanded View 1 Left Vertical Rails (x 2) 5 Center Sections (x 4) 2 Right Vertical Rails (x 2) 6 Top Brackets (x 2) 3 Base Brackets (x 2) 18 Casters (x 4) 4 Corner Sections (x 8) 19 Leveling Feet (x 4) To view manuals, videos, drivers, downloads, technical drawings, and more visit www.startech.
Package Contents Left Vertical Rail Right Vertical Rail Qty: 2 Qty: 2 Base Bracket Corner Section Qty: 2 Qty: 8 To view manuals, videos, drivers, downloads, technical drawings, and more visit www.startech.
Center Section Top Bracket Qty: 4 Qty: 2 M8 Bolt M8 Washer Qty: 50 Qty: 50 10 mm Wrench 13 mm Wrench Qty: 1 Qty: 1 To view manuals, videos, drivers, downloads, technical drawings, and more visit www.startech.
M6 Cage Nuts 8U/12U/15U/18U Qty: 24 Phillips Head Screwdriver 25U Qty: 32 Qty: 1 42U Qty: 50 M6 Plastic Washers M6 Phillips Head Screw 8U/12U/15U/18U Qty: 24 8U/12U/15U/18U Qty: 24 25U Qty: 32 25U Qty: 32 42U Qty: 50 42U Qty: 50 Cable Management Hooks Hook Mounting Screws 8U/12U Qty: 4 8U/12U Qty: 4 15U/18U Qty: 8 15U/18U Qty: 8 25U Qty: 12 25U Qty: 12 42U Qty: 24 42U Qty: 24 4
Casters Leveling Feet Qty: 4 Qty: 4 M6 Screws M6 Flat Washers Qty: 18 Qty: 18 M6 Flange Nut Grounding Wires Qty: 18 Qty: 4 To view manuals, videos, drivers, downloads, technical drawings, and more visit www.startech.
M6 Grounding Wire Bolts M6 Grounding Wire Lock Washers Qty: 4 Qty: 4 To view manuals, videos, drivers, downloads, technical drawings, and more visit www.startech.
Requirements For the latest requirements please visit www.startech.com/4POSTRACKxxU. • Pliers (sold separately) • 14 mm Wrench (sold separately) • Two People (for assembly) • Earth Ground Connection • (Optional) Spirit/Bubble Level (sold separately) Installation Note: Two people are required for the Rack assembly. Set the Mounting Depth 1. Align the Corner Sections (x 2) with the Center Sections (x1) and slide the Corner Sections overtop of the Center Sections. (Figure 1) Figure 1 2.
Mounting Depth Chart 3. Mounting Depth Setting Numbers Mounting Depth Setting Numbers 22 in. 0 and 0 32 in. 5 and 5 23 in. 1 and 0 33 in. 5 and 6 24 in. 1 and 1 34 in. 6 and 6 25 in. 1 and 2 35 in. 6 and 7 26 in. 2 and 2 36 in. 7 and 7 27 in. 2 and 3 37 in. 7 and 8 28 in. 3 and 3 38 in. 8 and 8 29 in. 3 and 4 39 in. 8 and 9 30 in. 4 and 4 40 in. 9 and 9 31 in.
4. Insert eight M8 Bolts through eight M8 Washers and into the holes in the Corner Sections (x2) and Center Sections. (Figure 3) Figure 3 5. Tighten the M8 Bolts on the Centre Section Assembly using the 13 mm Wrench. Assemble the Rack 1. Place one Left Vertical Rail and Right Vertical Rail on the ground so that they are parallel to one another. Note: The rack height numbers should be facing outwards and up. 2.
4. Insert two M8 Bolts through two M8 Washers and into the holes in the Base Bracket, Vertical Rails, and the Center Section Assembly. Repeat for the other side of the Base Bracket. (Figure 4) Figure 4 5. Tighten the M8 Bolts using the 13 mm Wrench. 6. Repeat steps 3 to 5 to install the second Base Bracket. 7. Lift the current assembly of parts upright. To view manuals, videos, drivers, downloads, technical drawings, and more visit www.startech.
8. Slide a second Center Section Assembly between the other side of the Base Brackets. (Figure 5) Note: The Setting Numbers on the Center Section Assembly should be facing the outside of the Rack. Figure 5 9. Slide the Left Vertical Rail between the Base Bracket and the Center Section Assembly. Note: The rack height numbers on the Left Vertical Rail should be facing upright. 10.
13. Slide a Center Section Assembly between the top of the Vertical Rails on the left-hand side of the Rack. 14. Slide a Center Section Assembly between the top of the Vertical Rails on the right-hand side of the Rack. 15. Place one Top Bracket on the top front side of the Rack. (Figure 6) Figure 6 16. Place a second Top Bracket on the top rear side of the Rack. 17. Insert eight M8 Bolts through eight M8 Washers and into the holes in the Top Brackets and the tops of the Vertical Rails.
Figure 7 Install the Leveling Feet Note: Flip the Rack onto its side to complete this step. 1. Insert the four Leveling Feet into the four holes located in the bottom of each Base Bracket. 2. Tighten each one of the Leveling Feet by hand, or with a 14 mm Wrench. (Figure 8) Install the Casters Notes: Flip the Rack onto its side to complete this step. Two people may be required to complete this step. 1. Align the four holes in a Caster with the four holes in the bottom of the Rack.
2. Insert four M6 Screws through four M6 Flat Washers and down through the holes in the Rack 3. Thread four M6 Flange Nuts onto the M6 Screws. (Figure 8) Figure 8 4. Hold the M6 Screws with the Pliers and tighten the M6 Flange Nuts with the 10 mm Wrench. Note: The M6 Screws will freely rotate if they are not held to prevent rotation. 5. Repeat steps 1 to 4 to install the three remaining Casters. Install the Cable Management Hooks 1.
Figure 9 3. Using the Phillips Head Screwdriver, tighten the Hook Mounting Screw, being careful not to over-tighten. 4. Repeat steps 1 to 3 to install the remaining Cable Management Hooks. Ground the Rack 1. Insert an M6 Screw through the Grounding Point on the Grounding Wire and into the Ground Hole located on the bottom of the Rack. (Figure 10) 2. Run the Grounding Wire under the Rack’s Frame. 3. Connect the Grounding Wire to an Earth Ground Connection.
Figure 10 Operation Adjust the Leveling Feet Unscrew the Levelling Feet by hand and with a 14 mm Wrench, until all four Levelling Feet are set to the same height and pressed firmly against the floor. Note: Use a Spirit/Bubble Level to ensure the Rack is level. To view manuals, videos, drivers, downloads, technical drawings, and more visit www.startech.
Warranty Information This product is backed by a two-year warranty. For further information on product warranty terms and conditions, please refer to www.startech.com/warranty. Limitation of Liability In no event shall the liability of StarTech.com Ltd. and StarTech.
Hard-to-find made easy. At StarTech.com, that isn’t a slogan. It’s a promise. StarTech.com is your one-stop source for every connectivity part you need. From the latest technology to legacy products — and all the parts that bridge the old and new — we can help you find the parts that connect your solutions. We make it easy to locate the parts, and we quickly deliver them wherever they need to go. Just talk to one of our tech advisors or visit our website.