
Quick Start Guide

1. Selected port LEDs
2. Input selection buttons
3. IR sensor
4. Function button
5. Status LED
6. Power button
Quick start guide
DE: Bedienungsanleitung - de.startech.com
FR: Guide de l'utilisateur - fr.startech.com
ES: Guía del usuario - es.startech.com
IT: Guida per l'uso - it.startech.com
NL: Gebruiksaanwijzing - nl.startech.com
PT: Guia do usuário - pt.startech.com
Manual Revision: 04/12/2016
For the latest information, technical specications, and support for
this product, please visit www.startech.com/HDVGADP2HD.
Packaging contents
• 1 x converter switch
• 1 x IR remote control
• 1 x screw kit
• 1 x mounting bracket kit
• 1 x footpad set
• 1 x RJ11-to-RS232 converter
• 1 x RJ11 cable
• 1 x universal power adapter (NA/EU/UK/AU)
• 1 x quick start guide
System requirements
• 1 x HDMI video display with cabling
• 1 x DisplayPort video source with cabling
• 1 x VGA video source with cabling
• 2 x HDMI video sources with cabling
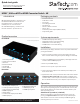
HDVGADP2HD
HDMI®, VGA and DP to HDMI Converter Switch - 4K
*actual product may vary from photos
Installation
Note: Ensure your display and video sources are powered o before
you begin installation.
1. Connect each of your video sources to the input ports on the
video converter switch using the required cabling (not included).
2. Connect an HDMI cable (not included) to your display and to the
converter switch’s HDMI input port.
3. Power on your HDMI display.
4. Power on each of your of your video sources.
5. Connect the power adapter to the switch’s power adapter port
and to an AC outlet.
6. (Optional for serial control) Connect the RJ11 cable to the switch’s
Control port (RJ11 serial jack) and to the RJ11-to-RS232 serial
converter. Then, connect a 9-pin serial cable (not included) to the
RJ11-to-RS232 switch and to your computer’s 9-pin serial port.
Operation
This converter switch features multiple operating modes. Review the
description and operating steps for each mode in this section, then
use the mode switch to the set the video converter switch to your
desired operating mode.
Switch mode operation (1. Switch)
Switch mode enables you to switch between video sources by
pressing the Input selection button that corresponds with your
desired video source. The active selected port LEDs will light up
indicating which port is selected.
Product overview
Front View
Rear View
1. DC12V power adapter port
2. Control port (RJ11 serial jack)
3. (In) Control port (IR extender)
4. HDMI output port
5. Mode switch
6. 3.5 mm audio input port (for VGA)
7. VGA input port
6
6
7
8
9
10
8. DisplayPort input port
9. HDMI input port #1
10. HDMI input port #2
Download the full instruction manual at
www.StarTech.com/HDVGADP2HD