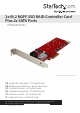
2x M.2 NGFF SSD RAID Controller Card Plus 2x SATA Ports PEXM2SAT3422 *actual product may vary from photos FR: Guide de l’utilisateur - fr.startech.com DE: Bedienungsanleitung - de.startech.com ES: Guía del usuario - es.startech.com NL: Gebruiksaanwijzing - nl.startech.com PT: Guia do usuário - pt.startech.com IT: Guida per l’uso - it.startech.com For the latest information, technical specifications, and support for this product, please visit www.startech.com/PEXM2SAT3422.
FCC Compliance Statement This equipment has been tested and found to comply with the limits for a Class B digital device, pursuant to part 15 of the FCC Rules. These limits are designed to provide reasonable protection against harmful interference in a residential installation. This equipment generates, uses and can radiate radio frequency energy and, if not installed and used in accordance with the instructions, may cause harmful interference to radio communications.
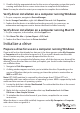
Table of Contents Introduction.............................................................................................1 Packaging contents................................................................................................................................... 1 System requirements................................................................................................................................ 1 Product diagram.....................................................................
Introduction You can use the PEXM2SAT3422 to install two M.2 NGFF drives into your desktop computer. The controller card is equipped with two SATA III (6Gbps) ports and supports hardware RAID. With its adjustable standoffs and multiple mounting holes, the card supports 110 mm, 80 mm, 60 mm, and 30 mm SSDs. The PEXM2SAT3422 comes with both a full-profile and low-profile bracket, and installs into x4, x8, or x16 PCIe slots.
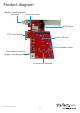
Product diagram Bracket (standard-profile pictured) 2x bracket screws 2x SATA ports PCIe x4 connector 2x M.
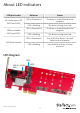
About LED indicators LED/pin header M.2 drive green LED (LED2 and LED3) SATA pin header (LED0 and LED1) LED all pin header Behavior Status LED is illuminated The drive is on and linked to the computer. LED is blinking The drive is being accessed. LED is illuminated The drive is on and linked to the computer. LED is blinking The drive is being accessed. LED is illuminated Any of the four drives is on and linked to the computer. LED is blinking Any of the four drives is being accessed.
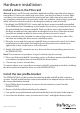
Hardware installation Install a drive in the PCIe card Warning! Drives and PCIe cards should be handled carefully, especially when they’re transported. If you’re not careful with your drives, you may lose data as a result. Make sure that you’re properly grounded by wearing an anti-static strap when you install any computer component. If an anti-static strap isn’t available, touch a large, grounded metal surface for several seconds to discharge any built-up static electricity. 1.
Install the PCIe card Warning! PCIe cards can be severely damaged by static electricity. If an anti-static strap isn’t available, discharge any built-up static electricity by touching a large grounded metal surface for several seconds. 1. Turn off your computer and any devices or peripherals that are connected to it (for example, printers, external storage, and so on). 2. Unplug the power cable from the back of your computer. 3. Disconnect any peripheral devices that are connected to your computer. 4.
5. Double-click the appropriate driver for the version of operating system that you’re running and follow the on-screen instructions to complete the installation. Note: You may be asked to restart your computer to complete the installation. Verify driver installation on a computer running Windows 1. On your computer, navigate to Device Manager. 2. Under Storage Controllers, right-click Marvel 92xx and click Properties. 3. Confirm that the device is installed and working correctly.
Prepare a drive for use on a computer running Mac OS Warning! When you complete the following steps, all of the data on your drive will be deleted. If your drive has data on it that you require, you should create a backup file or use a different drive. 1. Do one of the following: • In Spotlight, enter Disk Utility. • Open Finder. Navigate to Applications and click Utilities. Open Disk Utility. 2. Select the new drive and click the Partition tab. 3. Enter a name for the partition. 4. Click Apply.
4. Use the arrow keys to navigate the list of free physical disks. 5. Press the Spacebar to select the drives that will be part of the RAID set. When you select a disk, an asterisk appears to the left of the disk label. Note: To clear a disk selection, use the arrow keys to navigate to the disk that you don’t want to include in the RAID set and press the Spacebar. 6. When you have selected all of the disks that you want to include in the RAID set, press Enter. 7.
Technical support StarTech.com’s lifetime technical support is an integral part of our commitment to provide industry-leading solutions. If you ever need help with your product, visit www.startech.com/support and access our comprehensive selection of online tools, documentation, and downloads. For the latest drivers/software, please visit www.startech.com/downloads Warranty information This product is backed by a two-year warranty. StarTech.
Hard-to-find made easy. At StarTech.com, that isn’t a slogan. It’s a promise. StarTech.com is your one-stop source for every connectivity part you need. From the latest technology to legacy products — and all the parts that bridge the old and new — we can help you find the parts that connect your solutions. We make it easy to locate the parts, and we quickly deliver them wherever they need to go. Just talk to one of our tech advisors or visit our website.