
User Manual


Instruction manual
4
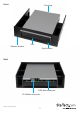
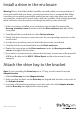
Attach the drive bay to the bracket
Note: If you’re installing the Drive bay into a 3.5” bay, you don’t need to use the
Adapter bracket.
1. Slide the Drive bay into the Adapter bracket.
2. Make sure that the holes on the Drive bay are aligned with the holes in the sides of
the Adapter bracket.
3. Insert two of the bracket-mounting screws into each side of the Adapter bracket
and the Drive bay, and tighten the screws in place.
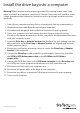
Install a drive in the enclosure
Warning! Drives should be handled carefully, especially when you transport them. If
you’re not careful with your drives, you may experience lost or corrupted data. Make
sure that you’re properly grounded by wearing an anti-static strap when you install
any computer component. If an anti-static strap isn’t available, touch a large, grounded
metal surface for several seconds to discharge any built-up static electricity.
1. If the cover plate is installed, use a screwdriver (not provided) to remove the
Housing assembly screws from the end of the Drive enclosure and take o the
cover plate.
2. Carefully pull the circuit board out of the Drive enclosure.
3. Gently slide the connector on your drive into the corresponding connectors on the
circuit board.
4. Use the drive-mounting screws to attach the drive to the circuit board.
5. Carefully slide the circuit board back into the Drive enclosure.
6. Replace the cover plate on the Drive enclosure, insert the Housing assembly
screws, and tighten them in place.
7. If you want to use the enclosure without the drive bay, connect one of the provided
USB Micro-B cables to the USB 3.1 Micro-B port on the enclosure and to your
computer.