
User Manual


Instruction manual
5
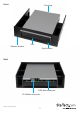
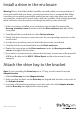
Install the drive bay into a computer
Warning! Make sure that you’re properly grounded by wearing an anti-static strap
when you install any computer component. If an anti-static strap isn’t available, touch
a large, grounded metal surface for several seconds to discharge any built-up static
electricity.
1. Turn o your computer and any devices or peripherals that are connected to it.
2. Unplug the power cable from the back of your computer.
3. Disconnect any peripheral devices that are connected to your computer.
4. Open your computer case and remove the cover from an empty front bay.
For more information about how to do this, consult the documentation that came
with your computer system.
5. Insert the Drive bay or Adapter bracket into the front bay slot, making sure that
the screw holes on the Drive bay or Adapter bracket are aligned with the holes
in the computer chassis.
6. If necessary, use the bay-mounting screws to secure the Drive bay or Adapter
bracket to the computer.
7. Connect the Drive bay to the computer’s power supply. If necessary, use either
the SATA to SP4 Molex power cable or the LP4 Molex to SP4 Molex
power cable.
8. Connect the SATA data cable to the SATA data connector on the Drive bay and
to a SATA port on the computer motherboard or a SATA controller card.
9. Place the cover back onto your computer case.
10. Reconnect the power cable to the back of your computer.
11. Reconnect any devices or peripherals that were connected to your computer.
12. Turn on your computer.