
Manual

Instruction Manual
DE: Bedienungsanleitung - de.startech.com
FR: Guide de l'utilisateur - fr.startech.com
ES: Guía del usuario - es.startech.com
IT: Guida per l'uso - it.startech.com
NL: Gebruiksaanwijzing - nl.startech.com
PT: Guia do usuário - pt.startech.com
Manual Revision: 02/24/2012
For the most up-to-date information, please visit: www.startech.com
Packaging Contents
• 1 x S25SLOTR hard drive rack
• 1 x 7-pin SATA cable
• 1 x LP4 molex to SATA power adapter and LED header
• 1 x Installation Guide
• 1 x Mounting Screw
• 1 x Hard Drive Protective Film
System Requirements
• Available rear expansion slot (full height)
• 2.5” SATA 1.5 or 3 Gb/s Hard Drive
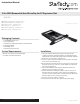
S25SLOTR
2.5in SATA Removable Hard Drive Bay for PC Expansion Slot
*actual product may vary from photos
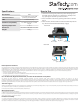
Installation
1. Turn your computer o and any peripherals connected to the
computer (ie. Printers, external hard drives, etc.). Unplug the power
cable from the rear of the power supply on the back of the computer.
2. Remove the cover from the computer case.
3. Locate an open expansion slot and remove the metal cover plate
on the rear of the computer case.
4. Place the Hard Drive Rack into the open expansion slot and screw
the bracket to the rear of the case. It will straddle any expansion
slot on the motherboard.
5. Connect the SATA data cable from the Hard Drive Rack to the
SATA port on your hard drive controller.
6. Use the LP4 molex to SATA power adapter cable to connect an
LP4 molex from the computer power supply to the SATA power
connector on the Hard Drive Rack. Connect the 4-pin LED header
from the adapter to the connector on the rack.
7. Place the cover back onto the computer.
8. Insert the power cable into the socket on the power supply.