
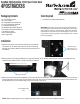
Owners manual
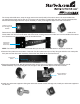

For the top and middle arms, snap the cage nuts into the back (inside) of the narrow arms. It is recommended that
you install several cage nuts on each arm. The cage nuts are easier to install when the rack is not fully assembled.You
should install more cage nuts than may be necessary in case you change the depth of the rack in the future.
Determine the desired depth of your rack. Using two screws, attach one of the arms to the holes on the inside of the
frame. Attach the other arm to the other side of the frame, making sure that the wider arm is on the outside of the narrow
arm. Secure the two arms together using the provided screws.
NOTE: For stability, StarTech.com recommends that you have use at least two screws to secure the rack arms.
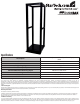
Place the floor plates over the bottom of the rack. One floor plate has only one “flap” along the side.You can overlap this 4.
floor plate over the other when necessary. Secure the floor plates to the rack from the top.
Secure the completed rack. Bolt the assembled rack into the ground or install the casters (StarTech.com ID: 5.
4POSTCASTER). If you are bolting the rack, the type of bolt you use will depend on the floor material.
Install your rackmount equipment. Using the rackmount cabinet screws and cage nuts, install your rackmount equipment 6.
into the rack.
Inside of a narrow
arm with cage nuts
installed
Connect the
arms to the
frames here
Secure floor
plates
Secure casters to
bottom of rack