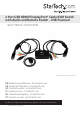
2 Port USB HDMI®/DisplayPort® Cable KVM Switch with Audio and Remote Switch – USB Powered SV211HDUA / SV211DPUA *actual product may vary from photos DE: Bedienungsanleitung - de.startech.com FR: Guide de l'utilisateur - fr.startech.com ES: Guía del usuario - es.startech.com IT: Guida per l'uso - it.startech.com NL: Gebruiksaanwijzing - nl.startech.com PT: Guia do usuário - pt.startech.com For the most up-to-date information, please visit: www.startech.
FCC Compliance Statement This equipment has been tested and found to comply with the limits for a Class B digital device, pursuant to part 15 of the FCC Rules. These limits are designed to provide reasonable protection against harmful interference in a residential installation. This equipment generates, uses and can radiate radio frequency energy and, if not installed and used in accordance with the instructions, may cause harmful interference to radio communications.
Table of Contents Introduction.............................................................................................2 Packaging Contents.................................................................................................................................. 2 System Requirements............................................................................................................................... 2 Installation..........................................................................
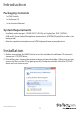
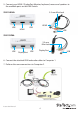
Introduction Packaging Contents • 1 x KVM Switch • 1 x Software CD • 1 x Instruction Manual System Requirements • Available video output - HDMI (SV211HDUA) or DisplayPort (SV211DPUA), USB and 3.5mm Audio/Microphone connections (if HDMI/DisplayPort audio is not being used) • Monitor, speaker/microphone and USB keyboard/mouse peripheral set Installation 1. Before connecting the KVM Switch, insert the included installation CD into each computer’s CD/DVD drive. 2.
3. Click the appropriate software installation option for your system, and available ports (“2-Port KVM” - Mac or Windows), and you will be prompted to click Next several times to complete the installation. 4. Once the installation is complete, a new system tray icon will display (Windows), or a new Application (Mac OS) with the following indicators.
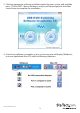
5. Connect your HDMI / DisplayPort Monitor, keyboard, mouse and speakers to the available ports on the KVM Switch. SV211HDUA USB 3.5 mm Mini-Jack HDMI HDMI USB USB SV211DPUA 3.5 mm Mini-Jack USB DisplayPort USB DisplayPort 6. Connect the attached KVM and audio cables to Computer 1. 7. Perform the same connections to Computer 2.
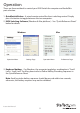
Operation There are three methods to control your KVM Switch for computer and Audio/Mic port selection: 1. QuickSwitch Button - A wired remote control for direct switching control. Simply press the button to toggle between the two computers. 2. KVM Switching Software (Windows & Mac platform) – See “Quick Reference Sheet” below for details. Windows Operation Menu Mac Settings Page Operation Menu Preferences Page 3.
Hotkey Quick Reference Guide Command Switcher Software Description Select PC Port Right-click the KVM Switching icon to evoke the operation menu, then select whichever computer that is available for switching. Select the active PC port Previous PC port Right-click the KVM Switching icon to evoke the operation menu, then select whichever computer that is available for switching.
Beeper Right-click the KVM Switching icon to evoke the operation menu, then check the box “Turn on Buzzer”. Beeper will be functional between operations of KVM switch Keep in Dock (Mac only) Right-click the KVM Switching icon to evoke the operation menu, and then select “Keep in Dock”. KVM switching icon will be on the system tray of your desktop Open at Login (Mac only) Right-click the KVM Switching icon to evoke the operation menu, then select “Open at login”.
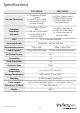
Specifications SV211DPUA SV211HDUA Console Connectors 1 x DisplayPort (20 pin) Female 2 x USB A (4 pin) Female 2 x 3.5mm Mini-Jack (3 Position) Female 1 x HDMI (19 pin) Female 2 x USB A (4 pin) Female 2 x 3.5mm Mini-Jack (3 Position) Female Computer Connectors (per port) 1 x DisplayPort (20 pin) Male 1 x USB 2.0 A (4 pin) Male 2 x 3.5mm Mini-Jack (3 Position) Male 1 x HDMI (19 pin) Male 1 x USB 2.0 A (4 pin) Male 2 x 3.
Technical Support StarTech.com’s lifetime technical support is an integral part of our commitment to provide industry-leading solutions. If you ever need help with your product, visit www.startech.com/support and access our comprehensive selection of online tools, documentation, and downloads. For the latest drivers/software, please visit www.startech.com/downloads Warranty Information This product is backed by a two year warranty. In addition, StarTech.
Hard-to-find made easy. At StarTech.com, that isn’t a slogan. It’s a promise. StarTech.com is your one-stop source for every connectivity part you need. From the latest technology to legacy products — and all the parts that bridge the old and new — we can help you find the parts that connect your solutions. We make it easy to locate the parts, and we quickly deliver them wherever they need to go. Just talk to one of our tech advisors or visit our website.