
User Manual
ManualsBrandsStartech ManualsComponents & AccessoriesStarTech.com 2 Port DisplayPort KVM Switch, 4K 60Hz, Single Display, Dual Port UHD DP 1.2 USB KVM Switch with Integrated USB 3.0 Hub and Audio, Dell, HP, Apple, Lenovo, TAA Compliant Keyboard/Video/Mouse Switch - KVM / audio / USB switch - 2 ports - TAA C

Quick-Start Guide
Manual Revision: 09/17/2018
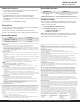
Product Diagram
Actual product may vary from photos
Front View
1. Console USB HID Port
2. Console USB Hub Port
3. LED Indicators
4. Port Selection Button
Rear View
1. Console DisplayPort Port
2. PC 2 DisplayPort Port
3. PC 1 DisplayPort Port
4. Power Input Port
5. USB HID Port
6. Console Audio Port
7. PC 2 USB Port
8. PC 2 Audio Port
9. PC 1 USB Port
10. PC 1 Audio Port
11. Console USB Hub Port
Package Contents
• KVM Switch x 1
• Universal Power Adapter (NA/JP, EU, UK, ANZ) x 1
• Rubber Foot Pads x 4
• Quick-Start Guide x 1
Requirements
Source PCs
• Computer (with DisplayPort) x 2
SKU #: SV231DPU34K
2-Port USB 3.0 KVM Switch - DisplayPort - 4K 60Hz - TAA Compliant
For the latest information, specications, and support visit www.startech.com/SV231DPU34K.
• DisplayPort Cable x 2
• USB 3.0 Cable (Type-A Male to Type-B Male) x 2
• (Optional) 3.5 mm Audio Cable (Male to Male) x 2
Console
• DisplayPort Display x 1
• DisplayPort Cable x 1
• USB Keyboard x 1
• USB Mouse x 1
• (Optional) Speaker-Enabled Audio Device (or Headset/
Headphones) x 1
• (Optional) 3.5 mm Audio Cable (Male to Male) x 1
• (Optional) USB 2.0 HID Devices x 2
• (Optional) USB 2.0 Cables x 2
• (Optional) USB 3.0 Peripherals x 2
• (Optional) USB 3.0 Cables x 2
Attach the Rubber Foot Pads
1. Peel o the backing for each of the Rubber Foot Pads.
2. Stick each Rubber Foot Pad onto the bottom of the unit, on each
of the four circular indentations.
Connect the Console
1. Power o your DisplayPort Display and any peripherals before
connecting to the KVM Switch.
2. Connect a DisplayPort Display to the Console DisplayPort Port on
the KVM Switch.
3. Connect a USB Keyboard and a USB Mouse to the Console USB
HID Ports on the KVM Switch.
4. (Optional) Connect your USB HID Devices to the Console USB HID
Ports on the KVM Switch.
5. (Optional) Connect your Speaker-Enabled Audio Device to the
Console Audio Port.
Connect the PC
1. Power o your Computer and any peripherals before connecting
to the KVM Switch.
2. Connect a DisplayPort Cable from the DisplayPort Port on the
Computer to the PC DisplayPort Port above PC 1 on the KVM
Switch.
3. Connect a USB A to B Cable (Type-A Male to Type-B Male) from
the USB A Port on the Computer to the PC USB Port below PC 1
on the KVM Switch.
Note: A USB 3.0 Cable is recommended for optimal performance.
4. (Optional) Connect a 3.5 mm Audio Cable from the audio port on
your Computer to the corresponding PC Audio Port below PC 1
on the KVM Switch.
5. Repeat steps 1 to 3 for an additional Computer for PC 2.
1
2
3
4
1 2 3
4
5
6
7
8
10
9
11
3