
Operating Instructions and Installation Instructions


10
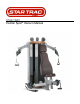
Shoulder Chest
INSTRUCTIONS
NOTE: Take special care when unwrapping unit, DO NOT use knifes to cut
open
packaging damage may
occur.
STEPS:
1. Take main body off the pallet and place it on the
floor.
2. Attach the (2) lower arms to their respective sides of the main
body.
(Note: cables are attached; take special care not to pinch, twist, or
damage
cables. Make sure the
cables travel straight).
Use (4) M12 washers and
(4) M
12 x 30 – button head screws to attach each assembly to the main
body,
tighten fasteners to (84 NM / 62 ft-lb)
torque.
3. Attach the (2) upper arms to their respective sides of the main
body.
(Note: cables are attached; take special care not to pinch, twist, or
damage
cables. Make sure the
cables travel straight).
Use (4) M12 washers and
(4)
M12 x 30 – button head screws to attach each assembly to the main
body,
tighten fasteners to (84 NM / 62 ft-lb)
torque.
4. Take the seat pad assembly; remove M6 Phillips head screw and
washer.
Slide seat pad assembly into
main body; re-install M6 Phillips screw
and washer.
5. Attach accessories to the
unit.
6. Place urethane boots under
feet.