
Manual


103
WPS-100-DVR-8CH Installation and Users Manual
© 2012 Wirepath Surveillance
9.5 MOTION DETECTION / PRIVACY MASK
Note: This feature is only available on DVRs with software versions 7.77.53 or higher. Update the DVR to the latest
version available on the SnapAV Website to use this feature.
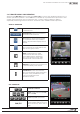
9.5.1 MOTION DETECTION
Motiondetectionallowstheadministratorleveluserstodenehowthesystemrespondswhenmotionisdetect-
ed for the camera.
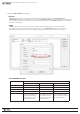
1. Select the Motion Detection / Privacy Mask tab.
2. Select the desired camera from the Camera dropdown list.
3. Select Motion from the Type dropdown list.
4. When opened, the area will show Yellow patterns over the camera image (Yellow indicates the areas the DVR
will detect for motion). Click and Hold the left mouse button and drag over the area(s) where motion detection
is not desired.
Tip: Select the entire visible area of the camera to remove motion detection from the camera. After doing so,
select the area in which motion detection is desired.
5. Adjust Sensitivity and Number of grids (number of boxes in the picture that must see motion before triggering) to
achieve the desired results. Adjust Sensitivity and Number of grids for all lighting conditions during setup for the
best results.
6. Select Upload to save the settings.
7. Repeat for all cameras connected to the DVR.
Tips for motion detection setup:
DVRs recognize the change in light to detect motion (this is different than the typical PIR security motion detec-
tor that uses multiple beams of infrared light). It is critical to understand possible changes in the scene to reduce
false motion detection. Generally it is easier to control the lighting and the scene in indoor environments for ac-
curate motion detection.
However, in exterior locations environmental factors such as shadows due to changes in weather or the position
of the sun, leaves blowing in the wind and even animals can falsely trigger motion detection. For highly sensitive
environments it may be better to use a 3rd party PIR motion detector connected to the alarm inputs on the DVR.
We recommend the use of higher quality cameras (such as our 500 and 700 series) that do not induce noise into
the picture in low light conditions that could false trigger the DVR.
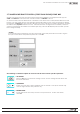
9.5.2 Privacy Mask
PrivacyMaskallowstheadministratorleveluserstodeneareasofthecameratonotbeshowninthecamera
image. There areas will be hidden with black boxes/grids
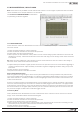
1. Select the Motion Detection / Privacy Mask tab.
2. Select the desired camera from the Camera dropdown list.
3. Select Privacy Mask from the Type dropdown list.
4. When opened, the area will show the camera image. Click and Hold the left mouse button and drag over the
area where privacy is desired. (Yellow indicates the selected Privacy area)
5. Select Upload to save the settings.
6. Repeat for all cameras connected to the DVR.
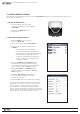
See Section 5.6 SOFTWARE UPGRADE for information
on performing a software upgrade.