
Manual


104
WPS-100-DVR-8CH Installation and Users Manual
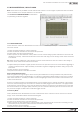
9.6 IPHONE REMOTE CONTROL
The following section describes the steps to add the WPS-DVR application to an iPhone, iPod or iPad and how
to operate the application.
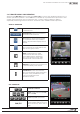
1. INSTALL THE APPLICATION
1. Access the iTunes App Store using
iTunes or your Apple Device and search
for WPS-DVR.
2. Install and run WPS-DVR on your
Apple Device.
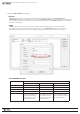
2. ADD THE DVR IN THE DEVICE LIST
1. Select the Add button to add the
DVR to the Device List.
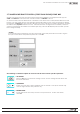
2. Enter a name for the DVR in Device Name.
3. Enter the DVR’s IP address or DDNS name
in Address.
•Ifconnectingonalocalnetwork,
enter the IP address (Ex: 192.168.0.101).
•IfusingDDNS,entertheregistereddomain
name (such as smithdvr.dyndns.com).
Note: Do not precede the address with
“http://” or add a port number to the
end of the address.
4. Enter the Control Port and Data Port numbers
that match the settings of the DVR and the
router that the DVR is connected to. By default,
these numbers are 67 and 68 respectively.
5. Enter the User Name and Password for the
DVR. By default, these settings are user and
1234 respectively.
6. If enabled, Auto Connect will establish a
connection with the DVR as soon as the
application is opened.
7. Select the OK button once settings are complete.
Recommendation: Enter two devices per DVR to the
DeviceList.Onecouldbenamed“Local”andthe
second“Remote.”Whentheuserisconnected
to the same local network as the DVR and selects
“Local,”theuserwillexperiencefasternetworkspeed.
When connected to a remote network, the user should
select“Remote”tostillhaveaccesstotheDVR.
WPS-DVR