
Manual


35
WPS-100-DVR-8CH Installation and Users Manual
© 2012 Wirepath Surveillance
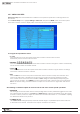
Functions in the Sub-menu:
•DURATION
Set the length of time the buzzer and the corresponding Alarm Out relay will remain triggered once video
loss is detected for this camera. The buzzer and Alarm Out relay will reset immediately once video signal
is restored. Press +/- buttons to adjust the value from 3 seconds to 60 minutes or ‘-‘forindeniterequiring
an Alarm Reset.
•CAMERATOGO
The Camera To GosettingwillspecifywhichPTZcamerawillgotoapredenedpresetwhenvideoloss
is detected for this camera. This feature is used in a system that includes PTZ cameras since the Camera
To Go must be a PTZ camera.
•GOTOPRESET
The GOTO Preset feature works in conjunction with the Camera To Gosettinganddenesthe
preset position the Camera To Go PTZ camera will go to when video signal is lost for this camera.
For more details about preset positions for PTZ cameras, refer to Section 7.
•PRE-RECORD
Pre-RecorddeneshowmuchtimetheDVRwillrecordbeforevideolossisdetected.ThePre Record FPS
set in Section 6.2 determines the frame rate of this recording. Press +/- buttons on the front panel of the
DVR or the remote control to adjust the value from 0 to 10 seconds. Alternatively use the mouse to adjust
this setting.
Note that the actual pre-record time may be shorter than the value set if the total size of the pre-record
video exceeds the pre-record video buffer.
•POST-RECORD
DenehowmuchtimetheDVRwillrecordaftermotionisdetected.ThePost Record FPS set in Section
6.2 determines the frame rate of this recording. Press +/- buttons on the front panel of the DVR or on the
remote control to adjust the value from 0 to 60 minutes. Alternatively use the mouse to adjust this setting.
•ALARMOUT
DenewhichAlarmOutputwillbetriggeredwhenvideolossforthiscameraisdetected.Press+/-
buttons to select N/A for none or either of the Alarm Outputs (1 for NC or 2 for NO).
•BUZZER
By default, the internal buzzer is enabled to sound when video loss for the camera is detected.
Highlight this setting and press ENTER or +/- to enable or disable this item. Alternatively use the mouse
to left-click on this item.
• LOG
By default, the DVR will log when video loss is detected to the Event Log (see Section 8.2). Highlight
this setting and press ENTER or +/- to enable or disable this item. Alternatively use the mouse to
left-click on this item.
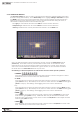
•SCREENMESSAGE
By default, the DVR will display a video loss message in the System Status Bar when video loss is detected
for this camera. Highlight this setting and press ENTER or +/- to enable or disable this item. Alternatively
use the mouse to left-click on this item.
•E-MAIL
ThisDVRcansendanemailmessagetoapredenedemailaddressintheeventvideolossisdetected
for this camera. Highlight this setting and press ENTER or +/- to enable or disable this item. Alternatively
use the mouse to left-click on this item. The default setting is disabled. See Section 6.10.1 for more
information on e-mail.
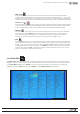
•FTP
This DVR can send the recorded video loss event for this camera to a FTP server. Highlight this setting
and press ENTER or +/- to enable or disable this item. Alternatively use the mouse to left-click on this
item. The default setting is disabled.