
Manual


36
WPS-100-DVR-8CH Installation and Users Manual
6.2.2.1 DETECTION SETTINGS
The Detection Setting sub menu is used to customize motion detection settings including the motion
detection area(s) and sensitivity. In the Motion Setup menu, highlight Settings in Detection and press
the ENTER button on the front panel of the DVR or remote control to display the Motion Detection
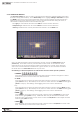
Settings sub menu for the selected camera. Once in the Motion Detection setting sub menu, a
video window is displayed with the area divided into grids.
•Gridsgray in color indicate the area which WILL be used for motion detection.
•Transparent grids indicate the area that will NOT be used for motion detection.
•Yellow grids indicate the currently selected area referred to as the Mask area.
Note: The dened detection area and sensitivity are also used for the Smart Search feature
(Section 8.3). Smart Search will only use information stored “inside” of the detection area.
There will not be any motion information stored by the DVR that is “outside” of the detection
area. Even if motion detection is disabled for a given camera, it is recommended to enable
the entire area if the Smart Search feature may be used.
Thefollowingisabriefdescriptionforeachiteminthesubmenuanditsspecicoperations:
•NUMERIC
Press these buttons on the front panel of the DVR or remote control to change the camera.
Alternatively use the mouse to select the desired camera.
•▲▼◄►
Press these buttons on the front panel of the DVR or remote control to move the Mask window
(grids yellow in color). Alternatively use the mouse to select and move the Mask window (grids
yellowincolor)by“leftclicking”anddraggingthemouseoverthedesiredarea.
•+/-
Press these buttons on the front panel of the DVR or remote control to resize the Mask window
(grids yellow in color). Alternatively use the mouse to select and move the Mask window (grids
yellowincolor)by“leftclicking”anddraggingthemouseoverthedesiredarea.
•ENTER
Press this button on the front panel of the DVR or remote control to Set/Reset the area of the
Mask window (grids yellow in color). Additional areas may be selected and added to the
detection area. Alternatively use the mouse to select the Set/Reset icon and adjust the Mask
window (grids yellow in color).
•MODE
Press this button on the front panel of the DVR or remote control to Set/Reset the whole video
area. Alternatively use the mouse to select this icon.