
Manual


52
WPS-100-DVR-8CH Installation and Users Manual
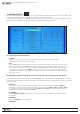
Thefollowingisabriefdescriptionforeachiteminthismenuanditsspecicoperations:
•TIMEZONE
Press the +/- buttons on the front panel of the DVR or on the remote control to select the appropriate
time zone. Alternatively use the mouse to select the time zone. The default setting is Eastern Standard Time.
•DAYLIGHTSAVINGTIME
Press ENTER or +/- on the front panel of the DVR or on the remote control to enable or disable this item.
Alternatively use the mouse to enable or disable this feature.
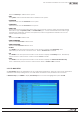
•SYSTEMTIME
- Synchronization
Press ENTER or +/- buttons on the front panel of the DVR or on the remote control to enable or disable
time synchronized with a TSP Server. Alternatively use the mouse to enable or disable this feature.
The default setting is disabled.
- TSP Server
If Time Synchronization is enabled, select a TSP (Time Synchronization Protocol) Server. The DVR will
synchronizewiththespeciedTSPserveratthesystempresetinterval.PleasefollowtheTextInput
method described in Section 4.1 to modify this setting. Alternatively use the mouse and the pop-up
keyboard to enter the TSP server.
- Date
System Date. Press +/- buttons on the front panel of the DVR or on the remote control to modify the
date. Alternatively use the mouse to set the date.
- Time
System Time. Press +/- buttons on the front panel of the DVR or on the remote control to modify the
time. Alternatively use the mouse to set the date.
- Display Format
Select the format used to display the system time in the System Status Bar. Press +/- buttons on the
front panel of the DVR or on the remote control to change the format. Alternatively use the mouse
to select the format.
•LANGUAGE
Press +/- buttons on the front panel of the DVR or on the remote control to change the language.
Alternatively use the mouse to select the appropriate language.
Note: If the selected language is changed, the user will be asked to reboot the system for the newly
selected language to take effect.
•PROTECTIONKEY
The Protection Key is used for secure remote access of the system by various software. Follow the Text
Input method described in Section 4.1 to modify these items. Alternatively use the mouse and the pop-up
keyboard to enter the Protection Key.
Note: The Protection Key will be used by some software for authentication when a remote computer
wants to connect with the system through the Ethernet interface, either LAN or internet. The same
protection key must be entered to install the remote software if it is to be used to access the DVR.
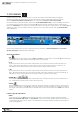
6.9 RS485 SETUP
The RS-232/422/485 Setup allows the administrator to setup the RS-485 control port. Please refer to
the manuals for the connected devices (typically PTZ cameras) to properly set the options in
RS-232/422/485 Setup.
In the Setup Menu
display,press▲▼◄►onthefrontpaneloftheDVRorontheremotetochangethe
highlighted option to RS-232/422/485, and then press ENTER to display RS-232/422/485 Setup as shown.