
Manual


56
WPS-100-DVR-8CH Installation and Users Manual
To navigate and operate this menu:
•▲▼◄►
Press these buttons on the front panel of the DVR or remote control to select an item.
Alternatively use the mouse to select an item.
•ESC
Press the ESC button on the front panel of the DVR or remote control to escape from this menu and
return to the main menu. Alternatively use the mouse to exit the sub menu by clicking on the “X.”
Ifthecontentsinthismenuhavebeenmodied,aSave dialog box will be displayed requesting the
user to save the changes. Press ENTER on the front panel of the DVR or remote control to exit and
save, ESCtoexitwithoutsaving.Anothermethodtoescapeistousethemouseto“right-click,”
and exit the sub menu.
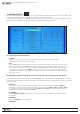
Thefollowingisabriefdescriptionforeachiteminthesubmenuanditsspecicoperations:
Follow the Text Input method described in Section 4.1 to modify these items. Alternatively use the mouse and
the pop-up keyboard to enter these settings. Consultation with the network administrator or the email
provider may be required for these settings.
•SMTPSERVER
Enter the SMTP mail server name.
•SMTPPORT
Enter the SMTP Port for e-mail transmission. The default value is 25.
•AUTHENTICATION
Press ENTER or +/- on the front panel of the DVR or on the remote control to enable or disable this item
depending on whether the SMTP mail server requires authentication. Alternatively use the mouse to
enable or disable this setting.
•USERNAME
Enter the Username to the email service.
•PASSWORD
Enter the Password to the email service.
•MAILFROM
Enter the e-mail address of the associated email account
Note: This setting is specic and must match email client settings used to access an email account or the
email feature will not be operable. Do not enter generic text in this eld.
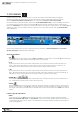
•MAILTO#1-5
TheDVRcansende-mailsoriginatedfromtriggeredeventstouptovedifferentemailaddresses.
Entertheappropriatee-mailaddressesintheseelds.
•ATTACHMENT
Press +/- buttons on the front panel of the DVR or on the remote to attach a picture from the
corresponding camera to e-mail being sent. Optional picture sizes for the attachment can be set
to Original to match the recorded resolution or QCIF (Quarter CIF is 176 x 144 pixels) to reduce the
size of the attachment. Select N/A to disable attachments.
Note: If the DVR’s resolution is set to Half D1, picture attachments in the e-mail will appear “squished”
since the DVR reduces the horizontal lines by half (therefore reducing storage space and bandwidth
requirements). This only effects e-mails and not live or recorded .h264 playback video.