
Manual


60
WPS-100-DVR-8CH Installation and Users Manual
7. PTZ CONTROL
The DVR supports a variety of PTZ cameras. The user can easily control PTZ cameras through the
operations described in this section if the PTZ cameras have been connected and setup properly.
Refer to Section 3.2 Optional Connections for the connections, Section 6.1 Pre-Camera Setup
to set the PTZ ID of each PTZ camera, and Section 6.9 RS-232/422/485 Setup to setup the RS485 control port.
If a camera is setup as a PTZ camera, an asterisk (
*
) will precede the camera title in the video window.
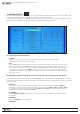
Select the PTZ Control icon to enter PTZ control mode if the focus camera is a PTZ camera. The asterisk (
*
) will
change to inverse color to indicate that the camera is now in PTZ control mode, and the PTZ Control Bar
will be displayed:
Once in PTZ control mode, the user’s operations can be divided into General Operations and Function
SpecicOperations described as the following:
General Operations:
•PTZ
Press this button on the remote control to Enter and Exit PTZ control mode. The asterisk (
*
) preceding the
camera title in the video window will change back to normal color.
•▲▼
Press these buttons on the front panel of the DVR or on the remote control to tilt the camera up or
down. Alternatively left-click the mouse in the top of the video window to tilt the camera up, or
left-click the mouse in the bottom of the video window to tilt the camera down.
•◄►
Press these buttons on the front panel of the DVR or on the remote control to pan the camera left or
right. Alternatively left-click the mouse in the left side of the video window to pan the camera left, or
left-click the mouse in the right side of the video window to pan the camera right.
•ZOOM( ) +/-
Press these buttons on the front panel of the DVR or on the remote control to zoom the camera in or
out. Alternatively use the mouse to select the zoom icons.
•GOTO
Press the GOTO button on the remote control to move the camera to a preset position. Press numeric
buttons on the remote control (0-9) to enter the number of the preset position to move the camera to.
The range of the preset positions is 00-99. Alternatively use the mouse to select the GOTO icon and the
preset.
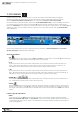
FunctionSpecicOperations:
•NEXT
Press this button for the Nextfunctionspecicoperation.Thefunctionsspecicoperationsinclude
Focus, Iris, Auto PAN, SEQ, Preset, and Pan Speed.Theactivefunctionspecicoperationwillbeshown
onthelowerrightcornerofthescreen.Themiscellaneousfunctionspecicoperationsaredescribed
in the following table.