
Manual


66
WPS-100-DVR-8CH Installation and Users Manual
the selected type of recorded video (beginning from the Search Time) to the connected backup device.
The Backup menu (described in the Archive portion of Section 8.6) will be displayed. Alternatively use the
mouse to select the COPY button.
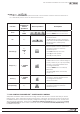
Thefollowingisabriefdescriptionforeachiteminthesubmenuanditsspecicoperations:
•EVENTTYPE
Press ENTER or +/- buttons on the front panel of the DVR or on the remote control to check or uncheck
the event type for the log list. Event type options include; Alarm, Motion, Video Loss, and System.
The event type System includes all system-related events that do not trigger recording such as power
on/off and Login/Logout. Alternatively use the mouse to enable or disable the appropriate event types.
•SOURCEID
Press ENTER or +/- buttons on the front panel of the DVR or on the remote control to check or uncheck
the Source ID to be searched. Check or uncheck ALL for faster operation. Alternatively use the mouse
to check or uncheck the Source ID(s).Thisfeaturehelpstoltertheeventsshownintheloglist.Forthe
Alarm event type, the DVR will search based on the Alarm Input number. For Motion and Video Loss event
types, the DVR will search based on the camera number.
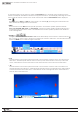
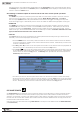
•LOGLIST
The Log List is the list of events according to the search parameters entered (Event Type and Source ID
selected). Once the list is displayed, the user may:
1. Press the ENTER button on the front panel of the DVR or on the remote control to select or deselect
an event in the log list. Multiple events can be selected in this manner. Alternatively use the mouse
to select or deselect events.
2. Press Play(►/II,►►) button on the front panel of the DVR or on the remote control to playback all
the selected events. Alternatively use the mouse to select the Play button.
3. Press Copy ( ) button on the front panel of the DVR or on the remote control to backup (copy) all
of the selected recorded video and audio events to the connected backup device. Alternatively
use the mouse to select the Copy button. The Backup menu (described in the Archive portion of
Section 8.6) will be displayed.
Press the +/- buttons on the front panel of the DVR or on the remote control to select the backup
device and enter the directory name to store the backup. Press the Copy button on the front panel
of the DVR or on the remote control to copy the recorded video and audio to the selected backup
device. Alternatively use the mouse to select the device and then the Copy button.
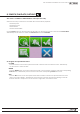
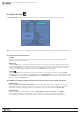
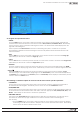
8.3 SMART SEARCH
The Smart Searchfeatureallowstheusertosearchformotioninaspecicareaofavideo(camera)window.
This is helpful to narrow down the search results if only a portion of the video window contains the event in
question.Forexample,ifasceneinanofceincludesasafeandthemanagerwantstoreviewwhoaccessed
thesafe,theareaofthevideowindowthatcontainsthesafecouldbedenedasthetheonlyportionofthe
recorded videos searched for motion.
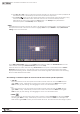
Note: the area of a video searched using Smart Search must be part of the dened area for Motion Detection
(see Section 6.2.2).