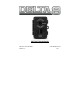
INSTRUCTION MANUAL For STC-‐ Q8X Toll Free 1-877-269-8490 www.stealthcam.net Version 1.
** IMPORTANT NOTE ** First, congratulations on purchasing one of the finest scouting cameras on the market today. We appreciate your business and want to prove to you we are committed to providing you the best product and support in the field.
TABLE OF CONTENTS Camera Overview 4 Camera Kit contents 6 General Information 7 Battery and Memory Installation 8 Setup and Programming 11 Using the camera 15 Viewing and Deleting files 19 Memory Compatibility chart 23 Technical Specs
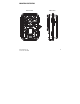
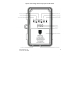
CAMERA OVERVIEW Side view TV USB OUT Front view TEST TIME OUT RESOLUTION BURST CAM TEST OFF SD LOW BAT ON 20s HI 1m MID 5m 10m UP LO DN 1P 3P 6P VIDEO VIDEO 15s 30s SET Wa r n i n g To e n s u r e p r o p e r water resistance, be sure both door latches are firmly closed. 877-269-8490 www.stealthcam.
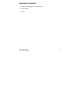
Open view image with major parts indication www.stealthcam.
CAMERA KIT CONTENT • Model STC-‐Q8X Digital Scouting Camera • User manual • Strap www.stealthcam.
GENERAL INFORMATION Special Care Instructions • Operating Environment: 14 to 104 deg F (-‐10 to 40 deg C). 20-‐85% relative humidity, non-‐condensing. • The camera is designed to be weather resistant. Never attempt to immerse the unit in water or any other liquid. This will damage the unit and void the warranty.
BATTERY AND MEMORY INSTALLATION WARNING: Do not use different Voltage lead acid battery other than the one specified in this section. Doing so will damage the camera and will void the warranty. WARNING: ALWAYS have the camera in the OFF position when installing or removing batteries and memory card. Removing batteries or memory card while the camera is ON may damage the camera.
3. Turn the camera to the ON position. 4. The camera will automatically switch to external power when it is connected, even if the internal batteries are installed. NOTE: Please make sure the voltage and polarity (+/-‐) are correct before connection. Incorrect voltage or polarity (+/-‐) will damage the camera.
Inserting SD memory card NOTE: Make sure camera is in the OFF position whenever adding or removing memory. • Insert SD memory card in to the SD card slot completely and in the correct direction, as shown by the picture shown on the Open View image above (see page 4).
SETUP AND PROGRAMMING Definitions • Cam: To set which mode you want the camera to be in. Ø TEST = Test mode Ø OFF = Power Off mode Ø ON = Active Passive Infrared mode / Power On mode • Time out: To set the amount of time the camera will sleep between PIR triggering.
• Video: Sets the length of time how long you want to capture video. Ø Ø • 15s = 15 seconds 30s = 30 seconds IR: This allows you to control how many emitters are activated per triggering depending on your need. Ø 46 IRs – Full illumination. Ideal for subject matter beyond 30ft. Ø 36 IRs – Reduced illumination.
Programming your Stealth Cam Camera NOTE: The following setting must be performed before you turn on the camera. 1. Select the time out interval by sliding the TIME OUT toggle switch to the desired preset time interval in minutes. 2.
h. The word DATE and DD will blink. Press [UP] or [DN] button to adjust the date. i. Press [SET] button to enter year setting. j. The word DATE and YY will blink. Press [UP] or [DN] button to adjust the year. k.
USING THE CAMERA Once all program settings have been setup properly, your Stealth Cam camera is ready for field use. Getting started Listed below are some helpful pointers on how to use your camera to get the best results.
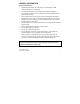
Mounting the camera with the supplied strap: 1. Insert the strap through the strap slots on the rear housing. 2. Wrap the strap around the mounting surface. Secure the strap and tighten the buckle in order to secure the camera.
(Example: Mounting) (Example: Trail Setup) www.stealthcam.
Testing the camera coverage area: One of Stealth Cam Scouting Camera’s features is the ability to test the coverage area. 1. After mounting the camera, open front housing and slide the CAM toggle switch to TEST position. The front LCD will display the word “tESt”. 2. Close the front housing. 3.
VIEWING AND DELETING FILES Your Stealth Cam Scouting Camera is a plug and play USB storage device for users of Windows 2000 / ME / XP / Vista / Windows 7 operating systems. This camera is not MAC compatible. Viewing files from your computer download: 1. FIRST, slide the CAM toggle switch to the OFF position.
5. At this point you have several options: Ø To view your images or play your videos: Click on the Removable Storage device and then drill down to the file you want to see and double click on the file name.
Deleting files in the field: Your camera provides you with a few options for deleting files stored on the internal or external memory while in the field. 1. Slide the CAM toggle switch to ON position. The LCD screen will display the number of images stored in the memory. 2. Press [SET] button to enter Delete mode.
Low Battery Indicator: Your camera is equipped with a low battery indicator. The Red Low Bat LED indicator will blink when battery is running low. 1. Turn off the camera. 2. Replace batteries. Be sure to use brand name alkaline batteries. www.stealthcam.
MEMORY COMPATIBILITY CHART The following cards have been tested and approved for use with the STC-‐Q8X model. Kingmax 2G SanDisk 2G, 4G, 8G Toshiba 2G PNY 2G, 4G, 8G, 16G. Kingston 2G, 4G, 8G, 16G. First Champion 1G, 2G, 4G, 8G, 16G.
TECHNICAL SPECIFICATIONS System Requirements and Compatibility • Windows Me/2000/XP/Vista/Windows7/Mac OS 10.6.X • Pentium 4, 2GHz or above • 1GB RAM (2GB recommended) • 32 bits color, resolution 800 x 600 or above. Built in 128MB video memory • 2GB free hard disc space • An available USB 1.1 port (USB 2.
CAMERA FEATURES AND SPECIFICATIONS • Auto white balance and auto expose • IR Emitter Range – 50ft • 4 digits LCD Image counter • Battery Low indicator • Green Test LED indicator • Focusing: 5 ft to infinity • High precision multi-‐layer glass lens with coating • Effective viewing Angle: 50 degrees • PIR detection angle: 48 degrees •
IMAGE CAPACITY CHART STC-Q8X Update 3-30-2011 Memory Card Size • Day Res Pixels Data size Resolution 1G 2G 4G 8G 16G 3,472 Hi 8.0M 4.7M 3264 x 2448 217 434 868 1,736 Lo 3.0M 2M 2048 x 1536 512 1,024 2,048 4,096 8,192 Base 1.3M 1M 1280 x 1024 1,024 2,048 4,096 8,192 16,384 AVI VGA 30's VGA 70M 640 x 480 / 30's 14 28 56 112 224 Night Res Piexls Data size Resolution 1G 2G 4G 8G 16G Hi 8.0M 2.
SD Card Capacity and Compatibility Due to the rapidly changing memory card market please consult www.stealthcam.net for the most up to date information regarding memory cards. MOON PHASE SYMBOL CHART www.stealthcam.
FREQUENTLY ASKED QUESTIONS (FAQs) Q: Can I use an external Battery on any Stealth Cam camera? A: All our models have an external 12V power jack for connecting to an external Sealed Lead Acid battery.
Q: What are my options if my camera is past it warranty? A: We have an out of warranty program in which you may purchase a refurbished/reconditioned replacement unit for 50% or more off (based on retail price of unit) discount exchange of your old unit.
WARNING: Modification not approved by the party responsible for compliance could void user’s authority to operate. FCC COMPLIANCE This equipment has been tested and found to comply with the limits for Class B digital device, pursuant to part 15 of the FCC Rules.