
Installation Guide


18 pg
Trouble Shooting Guide
You will need a voltage meter for the following procedures.
The Superior Encore uses two separate power supplies. The 110V power box which powers the keypad and the steam
generator controls and a 220-240-volt power supply that is connected directly to the steam generator itself which
powers the heating elements and other components of the generator. On a new installation or after use, always make
sure the keypad is light up. If the keypad does not light up when the dial is pressed make sure the power box is
connected to the 110v power supply and the keypad is connected to one of the pig tails coming out of the power box,
any of the pig tails can be used. NOTE - ANYTIME there is anything added or disconnected from the power box, the
power supply to the power box MUST be disconnected for 10 seconds and reconnected for the power box to recognize
any changes. Also, there is a short wire coming out of the keypad in addition to the power box wire. That wire is for the
external temperature sensor probe and is to be connected ONLY to the external temperature probe wire.
To start the steam cycle press the dial and the display will read OFF, press the dial again and it will change to ON and you
should hear water start going into the generator tank, you may after few seconds hear relays click on and off, that is
good. If you do not hear any water going into the generator, go to the section heading, NO WATER GOING INTO THE
TANK, below. Next you want to make sure the time and temperature are set. For initial runs or testing, set the time to
the maximum of 1 hr. and 59 minutes and the temperature to the maximum of 140 degrees. After 5 or 6 minutes you
should start to hear the water boil or steam coming out, if not the next step is to check the generator and its power
supply.
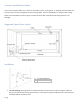
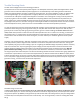
Verify the unit is getting the 220 – 240 volts required for proper operation. Test the two power lines A & B at the SAME
time. (See picture 1) You should get the 220 – 240 volts. You must test the power lines at the same time. Testing the
lines separately can give you a false reading. If you are not getting the 220-240 voltage requirement, take the necessary
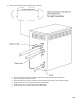
steps to correct the issue. If you are getting the proper voltage, the next step would be to check the manual hi-limit
switches above the heating element terminals on the side of the generator where the electrical wires are. Shut the
power off before proceeding. There is a square panel on the side close to the bottom, remove the screws that are
securing the panel and remove the panel. You will see the heating element terminals and some wires going upward and
connected to a square device, in the center of the square device you will see a button that has RESET on it (See picture
2) Press the button firmly. If you hear a click the switch was tripped and you just reset it. Check ALL the hi-Limit switches.
Turn on the power supply and the generator and wait a few minutes for the steam. If the previous steps do not get the
generator running, it is time to test the electrical components.
Picture 1 Picture 2
No Water Going into The Tank
IF YOU DO NOT HEAR ANY WATER RUNNING INTO THE TANK HERE ARE SEVERAL ITEMS YOU NEED TO CHECKOUT. Make
sure the water supply is on. For the next step you will have to remove the large side panel, this will expose the inside of
the generator (Picture 3). Midway on the generator you will see the water inlet valve (picture 4.) Set your voltage meter
to 20 volts DC, move the plastic terminal covers out of the way. Turn on the generator, as the unit is filling with water