
Installation Guide


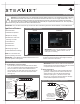

Steam
Generator
Shutoff Valve
Electric Water
Solenoid Valve
Cold Incoming
Water Supply
120 PSI Max
Tank
Steam Line
IMPORTANT: Install
steamhead 12” to 18" above
the shower floor or 6" above
the rim of the bathtub.
Union
(Required)
Water
Level
Probe
Pressure Safety Valve
Connect to indirect waste or as
required by local codes.
Optional Auto Drain Valve
Connect to indirect waste or as
required by local codes.
Plumbing Installation Instructions
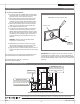
3. Steam Generator Installation
The Steam Generator should be mounted in a location conve-
nient for hook-up and service by the plumber and electrician.
CAUTION: The Steam Generator is designed to be used
ONLY in an upright and level position; to do otherwise would
damage the unit and void the warranty.
a) The Steam Generator can be mounted to a wall or
set on the floor. However, the unit must be secured.
To secure the unit to a vertical wall, loosen the two
screws holding the electrical access cover, remove
cover (see Figure 1). Located inside the cabinet
near the top left and right corners are mounting
holes. Place top cover back and secure.
Figure 2 - Plumbing Diagram
Installation Instructions Models: SMP-5, SMP-7, SMP-10, SMP12 and SMP-15
01/17
Pub. No. 232-A
- 2 -
b) Connect the ⅜" water inlet to a shut off valve as
described in Section 2.a. The valve must be kept in
an open position during normal operation. In an area
where water hammer is a problem install a water
hammer arrestor in the line. Refer to Figure 2.
IMPORTANT: Do NOT use a “saddle valve” or
piercing type valve for water connection.
c) Connect the steam line from rough-in location
described in Section 2 to the ¾" nipple on the Steam
Generator using a union.
4. Optional Auto Drain
If an Optional AutoDrain Valve (Model# AD-900) is installed,
please make sure to release the metal lever, to allow the valve
to close, while product is in use, see Pub# 270.