
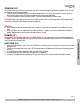
Installation Guide

SteamSpa PHONE: 800-856-0172 FAX: 866-560-1060 http://steamspa.com info@steamspa.com
Page 20
INSTALLATION & USER GUIDE
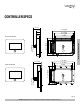
CONTROL PANEL INSTALLATION INSTRUCTIONS
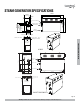
STEP ONE
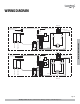
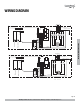
Determine the installation location of the control panel. The master control panel is designed to be installed in the steam room only,
please install:
1. 4-5 feet from the ground.
2. Keep away from the steam head and do not expose under the direct spray of steam.
3. Install in the perpendicular wall.
4. The position of installation should facilitate easy operation and convenient wiring.
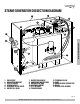
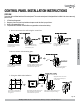
Create the hole for control
box. Make it 47 to 50 inches
from the ground.
Create the hole for mounting
plate. Make it 47 to 50 inches
from the ground.
Open a hole as shown above.
Make it 47 to 50 inches from
the ground.
A. Recess mount onto the wall using the control box.
B. Recess mount with mounting plate.
C. Using the double-sided adhesive.
Place control box into the
hole. Insert screws to hold
control box in place.
Fix the control panel to the control
box. Add a bead of silicone around
the edge to seal.
Fix the control panel to
the mounting plate.
Apply the sticker to the back
of the controller. And press
onto the wall.
Apply the double sided tape.
Apply the double sided tape to the
back. And add a bead of silicone
around the inner lip to seal.
Apply the double sided tape to the
back. And add a bead of silicone
around the inner lip to seal.
Make sure to add the extension rim
behind the control panel’s edge.
1.25”
.4”
4.5”
3.3”
4.72”
3.5”
2.95”
.15”