
Manual


Page 1 of 2 6/11/07 (AM)
PARTS LIST:
2
Front Mounting Brackets – small
4
12-1.75mm x 110mmm Hex Head Bolts
2
Rear Mounting Brackets – large
2
10-1.50mm x 32mm Hex Head Bolts
2
Support Brackets
2
10mm Lock Washers
4
½” x 2” Hex Head Bolt
4
10mm Flat Washers
8
12mm Lock Washers
2
10mm Hex Nuts
8
12mm Flat Washers
4
3” Plastic Rings
PROCEDURE:
1. REMOVE CONTENTS FROM BOX. VERIFY ALL PARTS ARE PRESENT. READ INSTRUCTIONS
CAREFULLY BEFORE STARTING INSTALLATION.
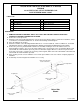
2. Remove the four body mounts.
3. Attach the front and rear Mounting Brackets to the body mounts with the 12mm x 110mm Hex Head Bolts, 12mm
Lock Washers, and 12mm Flat Washers as shown in the drawing, and hand tighten.
4. Place the Sidebars into position.
5. Attach the Sidebars to the Mounting Brackets with the ½” x 2” Hex Head Bolts, 12mm Lock Washers, and 12mm
Flat Washers. Place a 3” Plastic Ring between the Sidebar and the Mounting Brackets then hand tighten.
6. Remove the previously installed12mm x 50mm Hex Head Bolts holding the end of the Sidebar to the rear
Mounting Bracket. Put the short end of the Support Bracket up to the backside of the rear Mounting Bracket and
attach it with the 12mm hardware previously removed. Orient the Support Bracket so that the long end touches
the bottom of the frame. Using the hole in the long end as a guide, drill a 7/16” hole in the bottom of the frame and
attach it with the 10mm hardware provided.
7. After checking to make sure the Sidebars are level and square with the side of the vehicle completely tighten all
hardware.
8. Periodically check and retighten the hardware as necessary.
INSTALLATION INSTRUCTIONS
SIDEBAR
88-98 CHEVY/GMC C/K P/U EXTENDED CAB
PART NUMBER 200110 / 200117
12mm x 110mm
Hex Bolt
½” x 2” Hex Bolt
Body Mount
12mm x 110mm
Hex Bolt
½” x 2” Hex Bolt
Body Mount
Drill a 7/16” hole in the
bottom of the frame
Driver Side
Shown