
Use and Care Manual


-22-
ST1007/12/14 15" & 20" Planers (Mfd. Since 9/17)
Test Run
To test run machine:
1. Clear all setup tools and loose objects away from
machine.
2. Push STOP button in.
3. Connect machine to power supply.
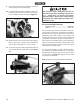
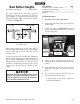
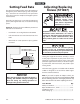
4. Twist STOP button clockwise until it springs out
(see Figure 21). This resets the switch so the
machine can start.
Figure 21. Resetting the switch.
Once assembly is complete, test run the machine to
ensure it is properly connected to power and safety
components are functioning correctly.
If you find an unusual problem during the test run,
immediately stop the machine, disconnect it from
power, and fix the problem
BEFORE
operating the
machine again. The Troubleshooting table in the
SERVICE section of this manual can help.
DO NOT start machine until all preceding setup
instructions have been performed. Operating
an improperly set up machine may result in
malfunction or unexpected results that can
lead to serious injury, death, or machine/prop-
erty damage.
Serious injury or death can result from
using this machine BEFORE understanding
its controls and related safety information.
DO NOT operate, or allow others to operate,
machine until the information is understood.
5. Press START button to turn machine ON. Verify
motor starts up and runs smoothly without any
unusual problems or noises.
6. Press STOP button to turn machine OFF.
7. WITHOUT resetting STOP button, try to start
machine by pressing the START button. The
machine should not start.
—If the machine does not start, the STOP
button safety feature is working correctly.
Congratulations! The Test Run is complete.
—If the machine does start (with the STOP
button pushed in), immediately disconnect
power to the machine. The STOP button safe-
ty feature is not working correctly and must
be replaced before further using the machine.
Call Tech Support for help.
After approximately 16 hours of operation,
V-belts will stretch and seat into pulley grooves
and need to be properly tensioned to avoid
severely reducing life of V-belts. Refer to
Tensioning/Replacing V-Belts on Page 36 for
detailed instructions.
Recommended
Adjustments
For your convenience, the adjustments listed below
have been performed at the factory.
However, because of the many variables involved
with shipping, we recommend that you at least verify
the following adjustments to ensure the best possi-
ble results from your new machine.
Step-by-step instructions for these adjustments can
be found in the SERVICE section starting on Page
39.
Factory adjustments that should be verified:
• Check V-belt tension (Page 37).
• Adjusting table height (Page 42).
• Pulley alignment (Page 49).