9 7528%/(6+227,1* *8,'( )25 5220 +($7,1* 81,76 02'(/6 (;7 (;7 (;7 (;7 (;7
35()$&( 7KLV JXLGH FRQWDLQV LQVWUXFWLRQV IRU WURXEOHVKRRWLQJ WKH 6WHIIHV &RUSRUDWLRQ URRP KHDWLQJ XQLWV 0RGHOV (;7 ,Q FRPSLOLQJ WKLV JXLGH 6WHIIHV &RUSRUDWLRQ KDV XVHG LWV EHVW MXGJHPHQW EDVHG XSRQ LQIRUPDWLRQ DYDLODEOH EXW GLVFODLPV DQ\ UHVSRQVLELOLW\ RU OLDELOLW\ IRU DQ\ HUURUV RU PLVFDOFXODWLRQV FRQWDLQHG KHUHLQ RU DQ\ UHYLVLRQV KHUHRI RU ZKLFK UHVXOW ZKROH RU LQ SDUW IURP WKH XVH RI WKLV JXLGH RU DQ\ UHYLVLRQ KHUHRI ,I WKHUH DUH DQ\ TXHVWLRQV FRQWDFW 6WHIIHV &RUSRUDWLRQ 7HFKQLFDO 6XS
MODEL: EXT FUNCTION: Core Charging PROBLEM: Unit Charges Improperly Place heat storage switch in the "On" position. Place charge level switch in the "Low/Auto" position. Turn thermostat all the way down (counter clockwise) to the low stop position. Energize heater, ensure that proper line voltage is present at L1 to L2 and F1 to F3. Remove the wiring from the charging disks and put jumpers in their place (white to gray, orange to gray, and yellow to gray). Jumper the blue and blue/white peak control wires.
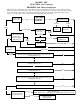
MODEL: EXT (2-Mode Circuit Board without Outdoor Sensor) FUNCTION: Core Charging PROBLEM: Unit Charges Unevenly Before starting any procedures listed below, check room thermostat and circuit breaker settings. NOTE: For cross reference to number coded components, refer to the Exploded View Diagram. UNIT CHARGES UNEVENLY Correct Check fans (53) and dampers for smooth operation. OK Correct Defective Repair fan/damper system. Incorrect Check unit amperage.
MODEL: EXT FUNCTION: Air Delivery PROBLEM: Fan(s) do not operate. Before starting any procedures listed below, check room thermostat and circuit breaker settings. Make sure there is appropriate line voltage between F1/F3 terminal block positions in the heater. The room temperature cannot exceed 85 degrees when performing the following test procedures. NOTE: For cross reference to number coded components, refer to the Exploded View Diagram.
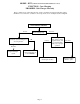
MODEL: EXT FUNCTION: Air Delivery PROBLEM: Discharge Air too Warm Before starting any procedures listed below, check room thermostat and circuit breaker settings. NOTE: For cross reference to number coded components, refer to the Exploded View Diagram. DISCHARGE AIR TOO WARM Check bimetallic coil assembly (39) for proper calibration (see note). OK Check for damper jamming or obstruction. Problem Present Repair or replace fan assembly (47).
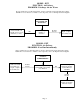
MODEL: EXT FUNCTION: Air Delivery PROBLEM: Discharge Air too Cool Before starting any procedures listed below, check room thermostat and circuit breaker settings. NOTE: For cross reference to number coded components, refer to the Exploded View Diagram. DISCHARGE AIR TOO COOL Refer to "Unit Charges Improperly" flow chart on Page 2 of this manual to troubleshoot. Problem with Core Charging Check for adequate core temperature. Check for damper jamming or obstruction.
MODEL: EXT FUNCTION: Peak Control PROBLEM: Green Off-Peak light does not come on at the appropriate times Before starting any procedures listed below, there must be appropriate line voltage present between F1/F3 and L1/L2 terminal block positions in the heater. No Correct Jumper Blue and Blue/White peak control wires inside the heater’s electrical compartment. Does the off-peak light illuminate? Yes Check unit wiring. Check wiring to peak control device.
EXPLODED VIEW DIAGRAM Page 8
EXT PARTS LIST DWG. REF. NO. 1. 2. 3. 4. 5. 6. 7. 8. 9. 10. 11. 12. 13. 14. 15. 16. 17. 18. " 19. 20. 21. 22. 23. 24. 25. 26. 27. 28. 29. 30. 31. 32. " 33. 34. 38. " 39. 40. 41. " 42.
(;7 3DUWV /LVW &RQWLQXHG« DWG. REF. NO. 43. " 46. 47. 48. 49. 50. 51. 52. 53. 54. 55. 56. 57. 58. 59. 60. 61. 62. 63. 64. 65. 66. 67. 68. 69. 70. 71. 72. 73. 74. 75. 76. 77. 78.