Mackie Control and Cubase
The information in this document is subject to change without notice and does not represent a commitment on the part of Steinberg Media Technologies GmbH. The software described by this document is subject to a License Agreement and may not be copied to other media except as specifically allowed in the License Agreement. No part of this publication may be copied, reproduced or otherwise transmitted or recorded, for any purpose, without prior written permission by Steinberg Media Technologies GmbH.
Table of Contents
5 Introduction 6 6 7 About this chapter The Steinberg layout for Mackie Control About Mackie Control XT 8 Basic mixing 9 9 10 10 10 10 11 About this chapter Selecting which channels to control Using the faders Rec/Rdy Mute and Solo Using the Select buttons A note about automation 12 Control strip assignment 13 13 15 16 16 17 18 18 19 19 20 20 About this chapter Basic procedures About the symbols used in this chapter Selected Channel: EQ Selected Channel: FX Send Selected Channel: Inserts Selected
1 Introduction
About this chapter The Steinberg layout for Mackie Control This chapter describes the Steinberg-specific layout for Mackie Control, and also provides information regarding the Mackie Control XT 8 channel extender unit. An overlay is included with your Mackie Control that shows all Steinberg-specific key assignments for this device. The overlay can be placed over the top right part of Mackie Control, above the transport controls. These key assignments are used to remote control Cubase.
About the Shift button In the Action Keys section, to the right in the second row of buttons, you will find the Shift button. The Shift button is always used in combination with another button to extend that button’s functionality. Pressing the Shift button alone has no effect. About Mackie Control XT Mackie Control XT 8 channel extender units are also supported. All faders and encoder/displays are combined into one continuous surface.
2 Basic mixing
About this chapter Using the controls in the Fader Banks section In the Fader Banks section, press the left or right Bank button to switch from one set of eight channels to the next. For example, if you are currently controlling Mixer channels 1 to 8, pressing the right Bank button will switch to the next eight channels, i.e. channels 9 to 16. To go back to the previous eight channels, press the left Bank button.
Using the faders Mute and Solo The faders of Mackie Control are used for hands-on level control and mixing, and allow precise adjustments of the corresponding channel levels in Cubase. Since the faders are motorized, they will move to reflect any level automation you have created in your projects. The faders will also move when you select a new set of eight channels to control, instantly jumping to reflect the current levels of the eight channels.
A note about automation The Read and Write buttons in the top row of the Action Keys section control the status of the Read and Write buttons in the Mixer of Cubase, allowing remote control of Mixer automation. • Press the Read button to enable or disable the reading of automation data for the selected channel. • Hold down the Shift button and press the Read button to enable or disable the reading of automation data for all channels.
3 Control strip assignment
About this chapter About the three modes Mackie Control operates in one of three modes: Selected Channel, Fader Set or Global. Which mode is used depends on which parameter group is selected. For example, pushing the Pan button in the Assignment section puts Mackie Control in Fader Set mode. This chapter describes the assignment of the control strip to access all VST settings in Cubase: EQ, effect sends, effect and VST Instrument parameters and so on.
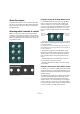
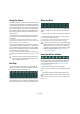
Fader Set mode The contents of the display depend on the selected parameter group. Here, the “Instruments” group is selected, and the display shows settings for one of the active VST Instruments: In this mode, you can view and edit a single parameter for eight different channels (the current Fader Set). You can think of this as working with a horizontal segment of a mixer desk, e.g. the pan controls for eight consecutive channels: The name of the selected parameter group.
• To view the parameter values without making any changes, press the Name/Value button in the Display section. About the symbols used in this chapter This makes the display switch to showing parameter values. Click the Name/Value button again to go back to parameter names. On the following pages, all the different parameter groups are described. The parameter groups are divided according to the three modes, Selected Channel, Fader Set and Global.
Selected Channel: EQ Selected Channel: FX Send Accessing the EQ controls for the currently selected channel is achieved by pressing the EQ button in the Assignment section. If you press Shift + EQ one band per page will be shown for the selected channel. Accessing the FX Send (auxiliary) controls for the currently selected channel is done by pressing the DYN button in the Assignment section. Pressing Shift+ DYN will step through Fader Set mode “FX Send 1” to “FX Send 8”.
Selected Channel: Inserts • Page 4 Controls to choose the destination of the FX send signal. Accessing the Insert Effect controls for the currently selected channel is done by pressing the Plug Ins button in the Assignment section. Please select a channel by pressing one of the Select buttons above the faders. • When Page 01 is selected, V-Pot 1 selects which of the insert slots is currently being edited (see “About parameter sub-groups” on page 15).
Selected Channel: Studio Sends Selected Channel: Instruments Accessing the Studio Sends controls for the currently selected channel is done by pressing the Sends and the Shift button in the Action Keys section. Accessing the Instrument controls for the currently selected channel is done by pressing the Instruments button in the Action Keys section. Please select a channel by pressing one of the Select buttons above the faders.
Fader Set: Pan Global: Send Effects Accessing the Pan controls for the current Fader Set is done by pressing the Pan button in the Assignment section. Mackie Control can control the parameters of the effects that are loaded in the first insert of FX channels. To access these effects, press the Sends button in the Action Keys section. The left/right panning of a channel in the current Fader Set is controlled by the corressponding V-Pot.
Global: Master Effects Global: Instruments Mackie Control can control the parameters of the effects that are loaded in the master effects section of the main output. To access these effects, press the Master button in the Action Keys section. Mackie Control can control the parameters of the instruments that are loaded in the VST Instruments rack. To access these, push the Instruments button in the Action Keys section and press Shift.
After an instrument plug-in has been selected in Cubase, the display will change to show the currently selected instrument in this effect slot and the ‘number of pages’ indicator will be updated to show the amount of pages necessary to display all the plug-in’s declared parameters.
4 Transport control
About this chapter The transport controls This chapter describes how to control playback, recording, positioning and the time display in Cubase from Mackie Control. The transport controls of Mackie Control are located in the lower right corner of the panel: Rewind Fast Forward Play Stop Record Cursor keys, see “Cursor keys” on page 27.
You can use Mackie Control to move directly to particular positions defined in your project with the aid of markers. Also, you can place such a marker at the current position in the project. The most common use for this is probably to move to the L and R markers – the left and right locators.
5 Other functions
About this chapter Working with windows This chapter describes the remaining functions available on the Mackie Control panel. Project functions The Save and Revert buttons in the Action Keys section of the panel have the following functionality: This is the same as selecting “Save” from the File menu in Cubase. The buttons above and to the left of the Markers section allow you to control project functions or to open and close windows in Cubase.
Cursor keys In the top right corner of Mackie Control, next to the display, you will find an LED labeled Rude Solo. This LED lights up as soon as any channel has been soloed. The Rude Solo LED Function keys Pressing the cursor keys located to the left of the jog wheel is the same as pressing the arrow keys on your computer keyboard. You can use the function keys F1 to F8 and function key combinations with the Shift button to access functions in Cubase.
Index
B N Bank buttons 9 Name/Value button 15 C O Channel buttons 9 Control strip 14 Cursor keys 27 Cycle button 26 Overlay 6 E Edit button 9 Effects Insert Effects 17, 18, 19 Master Effects 20 EQ Selected Channel mode 16, 18, 19, 20 F Fader Set mode 14 Faders 10 Flip button 9 FX Send Selected Channel mode 16, 17, 18, 19, 20 P Page Up/Down buttons 14 Pan Fader Set mode 18, 19 Parameter groups 13 Parameter sub-groups 15 Project button 26 Punch button 26 R Read button 11 Rec/Rdy buttons 10 Redo button 26