
User Manual


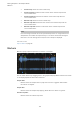


Table Of Contents
- Table of Contents
- Installation and Setup
- HALion Control Panel
- Common Editing Methods
- Global Functions and Settings
- Plug-in Functions Section
- Plug-in Name and Steinberg Logo
- Toolbar
- Keyboard Editor
- Quick Controls
- Value Tooltips
- Assigning Quick Controls
- Unassigning Quick Controls
- Single Assignment vs. Multi Assignment
- Quick Control Assignments Editor
- Managing Quick Controls
- Setting the Scope for Quick Control Assignments
- Receiving Quick Controls
- Adjusting the Curvature
- Setting the Mode for the Quick Control Assignment
- Neutral Setting
- Bypassing Quick Controls
- Assigning Quick Controls in the Modulation Matrix
- Options Editor
- AI Knob Support
- Automation
- Managing Your Sounds
- About Programs, Layers, Multis, Macro Pages, and Presets
- Registering VST Sounds
- Loading Programs and Layers
- Load Dialog
- Slot Rack
- Managing and Loading Files
- Managing Multis
- Managing Files via the MediaBay
- Loading Files Using the Browser
- Working with General MIDI Files
- Mapping Zones
- Editing Programs and Layers
- Editing Zones
- Adding Zones
- Zone Types
- Adding Samples to Empty Zones
- Absolute and Relative Editing
- Editing Selected Zones or All Zones
- Global Zone Settings
- Voice Control Section
- Voice Control Section for Organ Zones
- Pitch Section
- Oscillator Section
- Sample Oscillator Section
- Organ Oscillator Section
- Wavetable Section
- AudioWarp Section
- Filter Section
- Amplifier Section
- Envelope Section
- LFO Section
- Step Modulator
- Modulation Matrix
- Editing Samples in the Sample Editor
- Wavetable Synthesis
- Granular Synthesis
- MIDI Editing and Controllers
- Mixing, Routing, and Effect Handling
- Loading and Managing Programs via the Program Table
- Program Tree
- Program Tree Elements
- Program Tree Columns and Controls
- Editing Programs, Zones and Layers
- Importing Samples
- Replacing Samples
- Exporting Samples
- Exporting Programs and Layers with Samples
- Exporting Programs and Layers as HALion Sonic SE Layer Presets
- Importing Sliced Loops
- Selections in the Program Tree
- Navigating in the Program Tree
- Sorting the Program Tree Elements
- Setting Up the Program in the Program Tree
- Renaming Elements
- Sample Recorder
- Included Instruments
- Parameter List
- Macro Pages
- Macro Pages, Templates, Controls, Resources, and Libraries
- Getting Started
- Macro Page Designer
- Editing and Assembling Elements
- Libraries
- Connecting Macro Page Controls to HALion Parameters
- Collaborating on Macro Pages
- Cleaning Up and Consolidating Your Macro Pages
- Saving Macro Pages
- Library Creator
- Library Manager
- Effects Reference
- MIDI Modules Reference
- Key Commands Reference
- Note Expression
- Using the Standalone Version of the Plug-In
- Index

Editing Samples in the Sample Editor
Creating Loops
169
•
Set the start and end markers for the loop by dragging the marker handles or
press Shift and drag the audio before or after the loop end marker to adjust the
end or start position.
•
To automatically detect suitable loop start and end positions, click the Find
Previous Loop Start/End or Find Next Loop Start/End buttons.
The loop markers are set accordingly.
NOTE
The Loop Transition, Threshold, and Loop Score settings influence the marker
detection features.
Edit Loop
If Edit Loop is activated, the editor shows the looped region instead of the original sample
data. This is useful to fine-tune and adjust a loop. The waveform is updated to reflect the
result of your loop settings.
To better see how loop start and end are correlating, a part of the waveform is displayed
in blue on top of the loop. This part is taken from an area around the loop start (+/- the
loop length) and then shifted to the loop end. The better both waveforms correspond, the
smoother the sound of the loop.
Setting Up Loop Crossfades
Loop crossfades allow for smoother loops.
PROCEDURE
1. Activate Edit Loop on the toolbar.
Crossfade handles are displayed in the waveform display.
2. Click Sustain/Release Loop on the toolbar to select whether you want to edit the
sustain loop or the release loop.
3. Drag the crossfade handles or enter the crossfade range numerically in the parameter
section.
4. To see the effect of the crossfade, activate Show Resulting Loop Crossfade on the
toolbar.
The resulting waveform is displayed in red.
5. Adjust the crossfade curve by dragging the middle of the fade curve up or down.
Creating a Loop from the Selection
You can use a selection range as the basis for a loop.
PROCEDURE
1. Activate Play Selection Looped on the toolbar.
2. Click the Play Sample button on the toolbar.
3. Adjust the selection until you are satisfied with the loop.