
User Manual


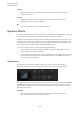


Table Of Contents
- Table of Contents
- Installation and Setup
- HALion Control Panel
- Common Editing Methods
- Global Functions and Settings
- Plug-in Functions Section
- Plug-in Name and Steinberg Logo
- Toolbar
- Keyboard Editor
- Quick Controls
- Value Tooltips
- Assigning Quick Controls
- Unassigning Quick Controls
- Single Assignment vs. Multi Assignment
- Quick Control Assignments Editor
- Managing Quick Controls
- Setting the Scope for Quick Control Assignments
- Receiving Quick Controls
- Adjusting the Curvature
- Setting the Mode for the Quick Control Assignment
- Neutral Setting
- Bypassing Quick Controls
- Assigning Quick Controls in the Modulation Matrix
- Options Editor
- AI Knob Support
- Automation
- Managing Your Sounds
- About Programs, Layers, Multis, Macro Pages, and Presets
- Registering VST Sounds
- Loading Programs and Layers
- Load Dialog
- Slot Rack
- Managing and Loading Files
- Managing Multis
- Managing Files via the MediaBay
- Loading Files Using the Browser
- Working with General MIDI Files
- Mapping Zones
- Editing Programs and Layers
- Editing Zones
- Adding Zones
- Zone Types
- Adding Samples to Empty Zones
- Absolute and Relative Editing
- Editing Selected Zones or All Zones
- Global Zone Settings
- Voice Control Section
- Voice Control Section for Organ Zones
- Pitch Section
- Oscillator Section
- Sample Oscillator Section
- Organ Oscillator Section
- Wavetable Section
- AudioWarp Section
- Filter Section
- Amplifier Section
- Envelope Section
- LFO Section
- Step Modulator
- Modulation Matrix
- Editing Samples in the Sample Editor
- Wavetable Synthesis
- Granular Synthesis
- MIDI Editing and Controllers
- Mixing, Routing, and Effect Handling
- Loading and Managing Programs via the Program Table
- Program Tree
- Program Tree Elements
- Program Tree Columns and Controls
- Editing Programs, Zones and Layers
- Importing Samples
- Replacing Samples
- Exporting Samples
- Exporting Programs and Layers with Samples
- Exporting Programs and Layers as HALion Sonic SE Layer Presets
- Importing Sliced Loops
- Selections in the Program Tree
- Navigating in the Program Tree
- Sorting the Program Tree Elements
- Setting Up the Program in the Program Tree
- Renaming Elements
- Sample Recorder
- Included Instruments
- Parameter List
- Macro Pages
- Macro Pages, Templates, Controls, Resources, and Libraries
- Getting Started
- Macro Page Designer
- Editing and Assembling Elements
- Libraries
- Connecting Macro Page Controls to HALion Parameters
- Collaborating on Macro Pages
- Cleaning Up and Consolidating Your Macro Pages
- Saving Macro Pages
- Library Creator
- Library Manager
- Effects Reference
- MIDI Modules Reference
- Key Commands Reference
- Note Expression
- Using the Standalone Version of the Plug-In
- Index

Effects Reference
Dynamics Effects
455
High Cut
Applies a high-cut filter to the signal. Only frequencies below the set frequency
are sent to the effect.
FX Level
Allows you to adapt the effect signal level to compensate for level reductions
caused by the low-cut and high-cut filters.
Mix
Sets the ratio between the dry and the wet signal.
Dynamics Effects
The effects Compressor, Limiter, Brickwall Limiter, Expander, Gate, and Maximizer work with
an internal look-ahead function to guarantee the best possible audio quality.
However, this look-ahead function introduces a small amount of latency. Usually, this is not
noticeable, but in some cases, it might introduce unwanted side effects. For example, if you
work with parallel compression where signals are sent to an AUX bus and being returned to
the rest of the mix, this might lead to unwanted flanging effects.
If you run into latency issues, you have the following possibilities:
•
For the effects Compressor, Expander, and Gate, activate the Live button to use the
effects without look-ahead functionality.
•
For the effects Limiter, Brickwall Limiter, and Maximizer, send the signals to one of the
plug-in outputs and add the corresponding effect directly in the DAW, to make use of
the host’s delay compensation.
Compressor
The Compressor reduces the dynamic range of a sound. This way, the sound gains
headroom. You can use this extra headroom to make the overall sound louder again.
The graphical control to the left indicates the compression curve. You can edit the Threshold
and Ratio values with the handles of this control. The input and output VU meters indicate
the level before and after the compression. The Gain Reduction meter indicates the current
attenuation of the level.
Threshold
Sets the threshold. Sounds that are louder than the threshold are reduced in
gain. Sounds below the threshold stay untreated.