
V-Stack
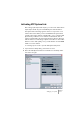


Table Of Contents

V-STACK
4 – 42 Setting up your system
3. Use the ASIO Input and ASIO Output pop-up menus to define which
channel should be the networking channel (and thus become a 23-bit
audio channel, in our example).
Quite often you will be able to just leave these pop-ups the way they are.
4. Click the Active checkbox at the top of the panel.
5. Repeat the steps above for every computer on the network.
As the computers are made active, you should see the small T (Trans-
mit) and R (Receive) lights flashing on each active computer, and the
name of each computer should appear in the list at the bottom of the
pane. Each computer is assigned a random number – don't worry
about this, it's just so the network knows internally which one is which.
• You can double click on the name in bold (which is the name of the
computer you’re currently working on) and set it to whatever other
name you wish.
This name will appear in the System Link window of every computer on the network.
• If you don't see the name of each computer appearing once you have
made it active, you may have to check your settings.
Go through the procedure above again and make sure that all ASIO cards are listening
to the digital clock signals correctly, and that each computer has the correct inputs
and outputs assigned to the System Link network.