
Instructions / Assembly


6
C C
D
F
F
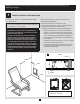
4. Perforate one of the
seven pre-cut holes.
Choose the hole
according to the power
cable’s position in the
wall and the available
space.
ATTENTION : Be sure to push in the right hole by
placing the back box in the correct direction. The
notches must be positioned at the bottom [C].
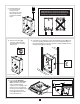
6. If wall nish is not installed yet, attach the self-adhering spacer [E] to one
of the four specially identied spots on the external side of the back box
that will rest against the stud. If the wall nish is already installed, the self-
adhering spacer [E] is not required.
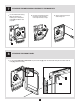
5. Place the wire clamp [D]
in the hole. Insert the power
cable through the wire clamp
and secure it.
* Wire clamp not included
*
SIDE VIEW
7. For the models WITHOUT
built-in electronic thermostat
ONLY, the heater is provided
with a jumper that allows
installer to pick a wattage onsite
without any tool. To reduce the
full factory wired wattage output
by half, remove the pull-out
jumper [F] located on the side
of the mechanical box.