Tractor Interface Module Installation Instructions 821-7000 & 821-7001
Installation Instructions Tractor Interface Module 821-7000 & 821-7001 Getting Started........................................................................................ 1 Installing the TIM...................................................................................... 2 Testing the TIM.. ....................................................................................... 6 Certifications........................................................................................................
Installation Instructions Tractor Interface Module Getting Started The Tractor Interface Module (TIM) is an intuitive device that interfaces between the PeopleNET on board computer and the BatRF wireless TPMS sensors. It wirelessly receives the tire pressure information transmitted from the BatRF Airbat TPMS sensors to provide alerts to the driver on the PeopleNET display and to remote personnel via email or SMS text messages.
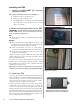
Installing the TIM 1. Locate the PeopleNET g3 onboard computer (OBC). TIP – Typical mounting locations for the g3 OBC are: a. Behind or under the passenger seat b. Behind or under the driver’s seat c. For sleeper cabs, in the storage area under the bed accessible from the outside of the truck, or in the closet near the bed. 2. Select a mounting location for the TIM.
4. 821-7000- RS232 Cable ONLY Install the RS232 cable between the TIM and the g3 OBC. Both power and serial communications are run through this cable (eliminates the need for a separate power cable). 4a. Plug the 9 pin D end of the cable to the TIM and tighten the thumb screws. 4b. Connect the 6 pin round DIN connector to the BLACK insulated 6 pin DIN connector that comes out of the breakout connector of the PeopleNET OBC and tighten the locking thumb nuts together by hand.
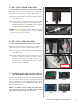
821-7000 – RS232 Cable ONLY Instructions 5a. Classic - From the main menu select “Main” and use the down arrow to scroll through the menu options to the bottom of the list. Select “OBC Administration” from the main menu. Tablet/BLU - From the “Home” screen select “System” (top right) and then “OBC Diagnostics”; scroll down in the list box and select “OBC Administration” Classic LCD Display Tablet BLU & BLU II 5a 5a 5b 5b. ALL - Using the keyboard enter the password, “9238” and press “Enter”. 5c.
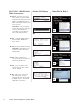
821-7001 – USB Cable ONLY 5a. Classic - From the main menu select “Menu” and use the down arrow to scroll through the menu options to the bottom of the list. Select “OBC Administration” from the main menu. Classic LCD Display 5a Tablet/BLU - From the “Home” screen select “System” (top right) and then “OBC Diagnostics”; scroll down in the list box and select “OBC Administration” 5b. ALL - Using the keyboard enter the password, “9238” and press “Enter”. Tablet BLU & BLU II 5a 5b 5c.
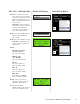
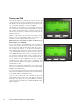
Testing the TIM After the PN display has powered up, wait for at least 35 seconds then press the “UP” arrow key until you see the top line (bottom line for Tablet/BLU displays) of the display that says “*ok BatRF TPM0 S0” as shown in Figure 1. You will know the installation is successful when you see the first character in the top line alternating between an asterisk and a space or exclamation point. The flashing asterisk will indicate that he TIM unit is communicating actively with the PN display terminal.
Certifications FCC (USA) This unit complies with Part 15 of the FCC Rules. Operation is subject to the following two conditions: (1) this device may not cause harmful interference, and (2) this device must accept any interference received, including interference that may cause undesired operation. FCC ID: SRA-821 This equipment has been tested and found to comply with the limits for a Class B digital device, pursuant to Part 15 of the FCC Rules.